Active Directory (AD) serves as the cornerstone of enterprise identity and access management, providing centralized control over network resources and user authentication. This comprehensive laboratory guide walks through the complete lifecycle of user management in Active Directory, from initial creation to account deactivation. Through practical scenarios following a new employee, Stacy Smith, we’ll explore the essential tasks that IT support professionals perform daily, ensuring secure and efficient user administration.
Our hands-on laboratory encompasses the complete spectrum of Active Directory management tasks, demonstrating real-world scenarios that IT professionals encounter. Each section builds upon the previous ones, creating a coherent learning experience that mirrors actual workplace situations. This guide covers user creation, group management, organizational structure, workstation configuration, password management, and account security controls.
Scenario 1: New User Account Creation
Understanding the Context
The IT department has received a ticket to onboard Stacy Smith, a new Marketing Manager who will work from Office 349. This scenario demonstrates the meticulous process of establishing a new user presence within Active Directory. Proper attention to detail during this initial setup ensures smooth integration into the organization’s digital environment.
Account Creation Process
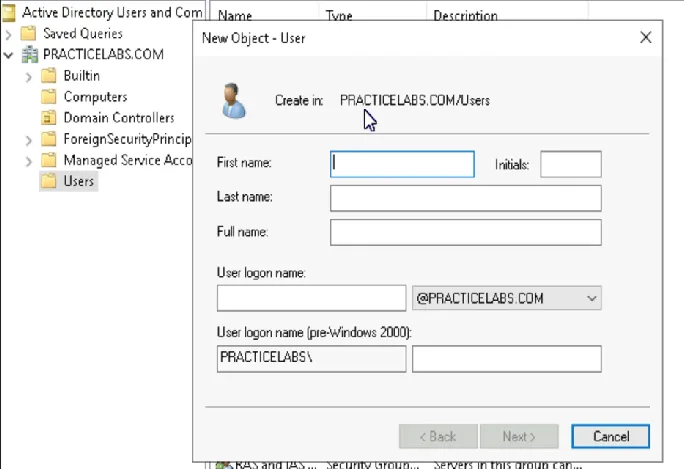
- Accessing Active Directory Users and Computers Begin by launching the Active Directory Users and Computers (ADUC) console. This powerful administrative tool serves as your primary interface for user management. Navigate through the domain structure to locate the Users container, where we’ll create Stacy’s account.
- Initiating the New User Wizard Within the Users container, right-click on empty space and select New, then User. This action launches the New Object – User wizard, which guides you through the account creation process. The wizard ensures all necessary information is collected in a structured manner.
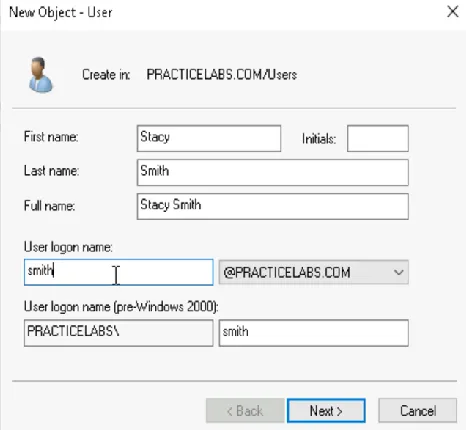
- Entering User Information Carefully complete each field in the user creation form:
- First Name: Enter “Stacy”
- Last Name: Enter “Smith”
- Full Name: This typically auto-populates as “Stacy Smith”
- User Logon Name: Choose according to your organization’s naming convention, such as Stacy.Smith@company.com or SSmith@company.com
Password Configuration
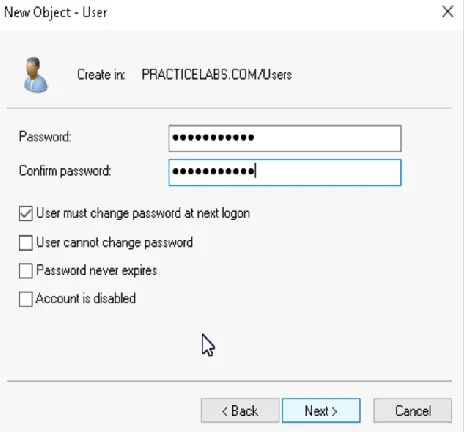
The initial password setup requires careful consideration of security policies. When configuring Stacy’s password, several critical decisions must be made:
- Temporary Password Assignment Consult with management regarding the standard password policy. Some organizations use a standard temporary password, while others generate unique passwords for each user. Enter the chosen password according to your organization’s complexity requirements.
- Security Settings Configuration Configure the following security settings with careful consideration:
- Select “User must change password at next logon” to ensure immediate password personalization
- Leave “Password never expires” unchecked unless specifically required
- Verify any additional password policies specific to your organization
Property Configuration
After creating the basic account, additional configuration ensures proper integration into the organizational structure:
- Accessing Properties Locate Stacy’s newly created account and access its properties through the context menu. The properties dialog provides extensive configuration options across multiple tabs.
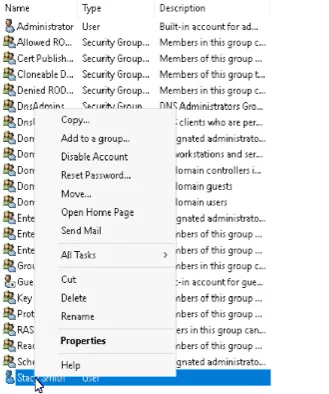
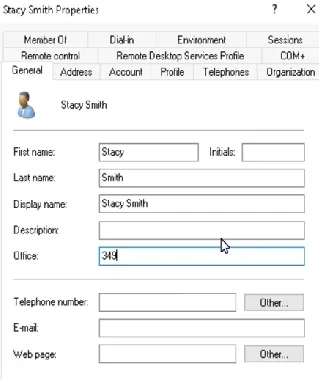
- General Information Setup Navigate to the General tab and enter “349” in the Office field. This information helps with physical asset management and user location tracking.
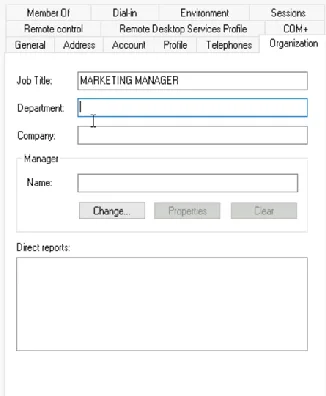
- Organizational Details In the Organization tab, enter “Marketing Manager” as the Job Title. Add any additional departmental information or reporting structure details as required by your organization.
Scenario 2: Security Group Management
Understanding Group Structures
Security groups in Active Directory provide an efficient mechanism for managing access permissions and resource allocation. The creation of the Marketing security group demonstrates the importance of proper group management in maintaining organizational security.
Creating the Marketing Group
- Group Creation Process Begin in ADUC by right-clicking the Users container and selecting New → Group. Enter “Marketing” as the group name. The selection of group type carries significant implications for functionality: Security Groups manage access permissions to resources, while Distribution Groups handle email distribution. For the Marketing team’s needs, select Security Group to enable access control management.
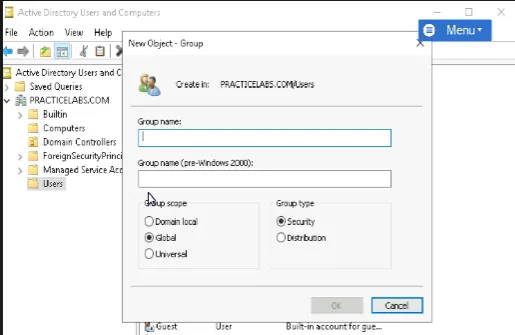
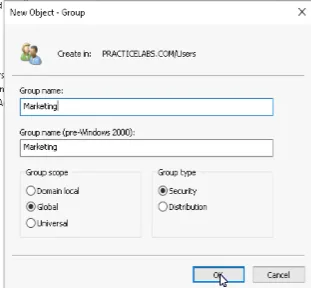
- Scope Selection Choose the appropriate group scope based on your domain environment:
- Global: Best for most situations, allowing cross-domain usage
- Domain Local: Used for assigning permissions to resources
- Universal: Suitable for multi-domain forests
Member Management in the Marketing Group
After creating the Marketing security group, we must add Stacy as a member. This process establishes her departmental affiliation and grants her the necessary access permissions. Access Stacy’s user properties and navigate to the Member Of tab. Click Add and search for the Marketing group. After selecting it, click OK to confirm the membership. Remember to verify the addition by reviewing the Member Of tab again.
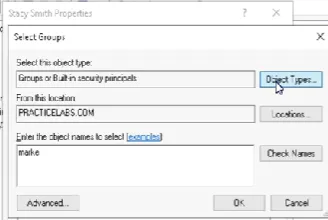
When considering elevated privileges, such as Domain Administrator access, exercise extreme caution. While the process of adding a user to the Domain Admins group follows the same steps, this level of access grants complete control over the domain and should be restricted to only those users who absolutely require it.
Scenario 3: Organizational Unit Structure
Understanding Organizational Units
Organizational Units (OUs) represent one of Active Directory’s most powerful features for administrative control and policy management. By creating the MarketingOU, we establish a logical container that simplifies policy application and resource management for the entire marketing department.
Creating the Marketing Organizational Unit
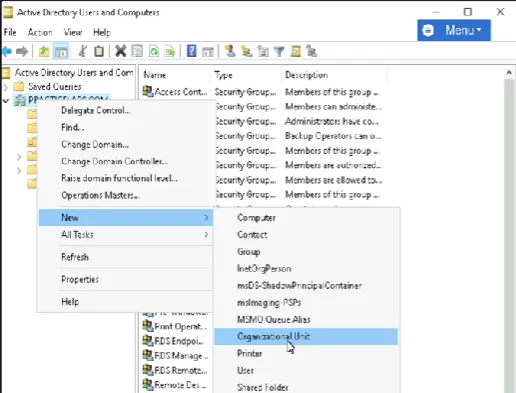
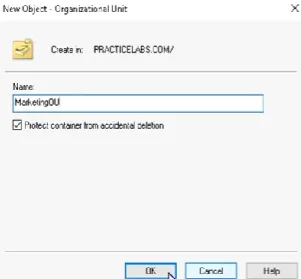
- Initiating OU Creation Begin in the Active Directory Users and Computers console. Locate and right-click on your domain name in the left-hand panel. Select New, then Organizational Unit from the context menu. When the New Object window appears, enter “MarketingOU” as the name. This name should reflect its purpose while remaining clear and consistent with your naming conventions.
- Understanding OU Purpose Organizational Units serve multiple critical functions in Active Directory management. They enable administrators to:
- Apply Group Policy Objects (GPOs) efficiently to specific sets of users and computers
- Delegate administrative control to department-specific IT staff
- Organize resources logically according to business structure
- Simplify permission management across large user bases
Consider a practical example: In an organization with 500 groups and 5000 employees, managing permissions and policies individually would be impossibly complex. OUs provide a hierarchical structure that allows administrators to apply policies once at the OU level, affecting all contained objects automatically.
Moving Resources to the MarketingOU
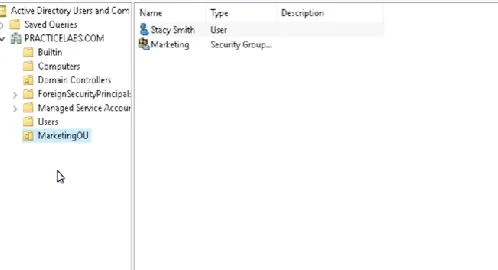
- User Migration Begin by locating Stacy Smith’s account in the Users container. Right-click on her account and select Move. In the resulting dialog, select MarketingOU as the destination. This action places her account within the marketing department’s organizational structure.
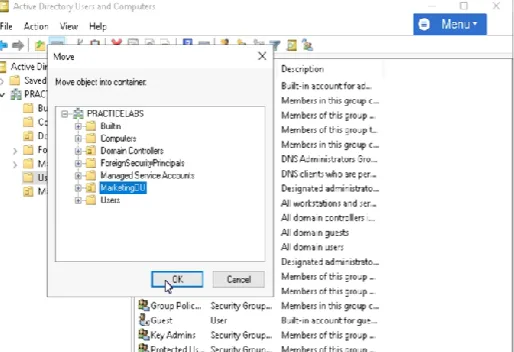
- Group Migration Similarly, locate the Marketing security group and move it to the MarketingOU. This ensures that all marketing-related Active Directory objects reside in their proper organizational location, simplifying ongoing administration.
Scenario 4: Workstation Configuration
Domain Integration Process
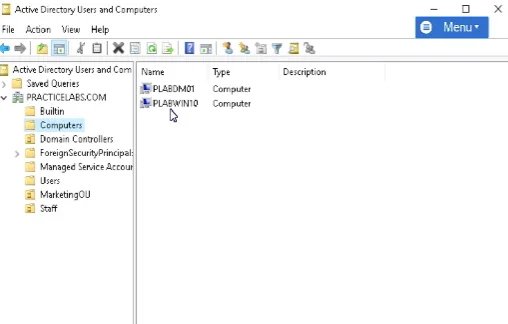
When setting up Stacy’s workstation, proper domain integration ensures secure access to organizational resources. This process involves several carefully executed steps to establish the machine’s domain membership.
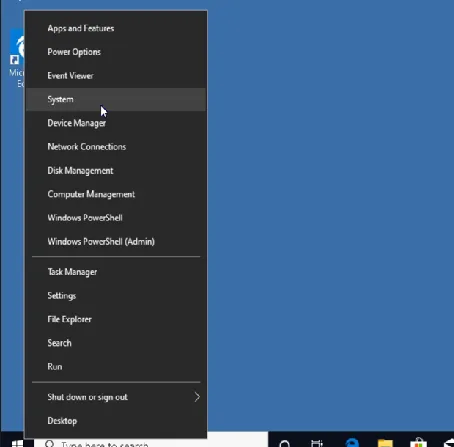
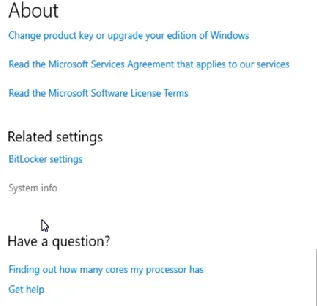
- Initial System Configuration Begin by accessing the Computer Management Panel. Navigate to the System settings by right-clicking the Windows 10 Start Menu and selecting System. Open System Information to verify the current configuration and ensure the machine meets domain joining requirements.
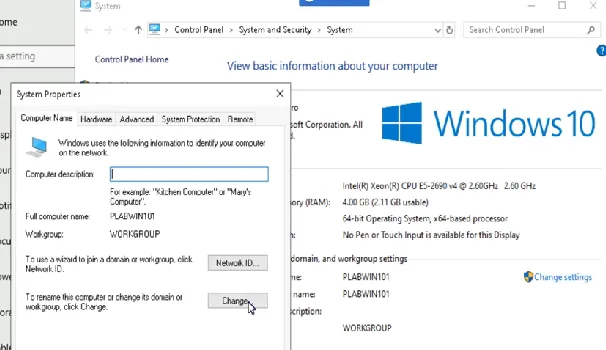
- Domain Joining Procedure Click “Change settings” under the Computer name, domain, and workgroup settings section. In the System Properties dialog, click the Change button to modify domain membership. Select the Domain option and enter your organization’s domain name. When prompted, provide administrator credentials that have permission to join computers to the domain.
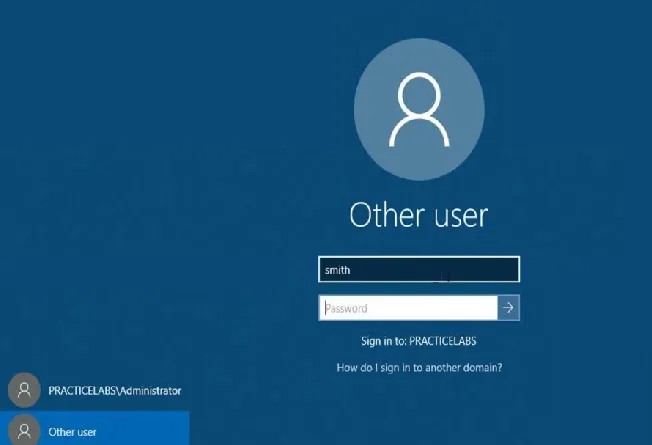
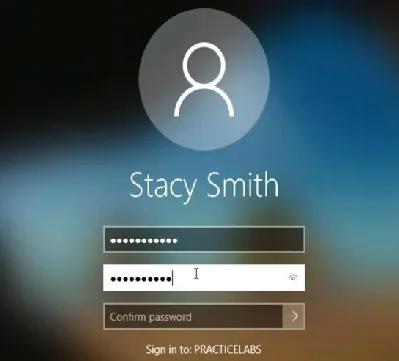
- Authentication Verification After the domain join process completes, restart the computer to apply the changes. At the login screen, select “Other user” and enter Stacy’s domain credentials. The system will authenticate against the domain controller, establishing proper domain connectivity.
Scenario 5: Password Management
Password Reset Process
Users occasionally forget their passwords or need them reset for security purposes. The password reset process must balance security requirements with user accessibility.
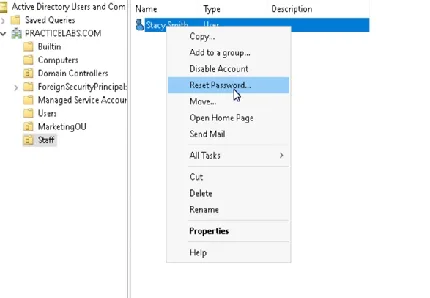
- Accessing Password Reset Functions Open Active Directory Users and Computers and navigate to Stacy’s account location. Right-click on her account and select “Reset Password” from the context menu. This action initiates the secure password reset process.
- Temporary Password Assignment When the reset dialog appears, enter a new temporary password that meets your organization’s complexity requirements. Ensure the “User must change password at next logon” checkbox is selected. This security measure forces immediate password personalization by the user.
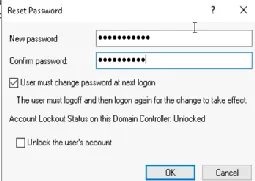
- User Communication While speaking with Stacy, provide the temporary password securely. Inform her that she will be prompted to change this password upon her next login. This immediate change requirement ensures that only Stacy knows her permanent password.
Account Unlocking Procedure
When users experience account lockouts due to multiple failed login attempts, a structured unlocking process maintains security while restoring access.
- Accessing Account Properties In ADUC, locate Stacy’s account and access its properties. Navigate to the Account tab, where you’ll find the account status information.
- Unlocking Process Look for the checkbox labeled “Unlock account” and select it. This action removes the lockout state, allowing login attempts to resume. Click Apply and OK to save these changes.
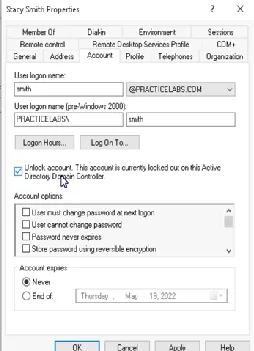
- Verification Steps After unlocking the account, have Stacy attempt to log in again. If she continues to experience issues, verify her password hasn’t expired and consider whether a password reset might be necessary.
Scenario 6: Account Deactivation
Secure Account Disabling
When an employee departs the organization, proper account deactivation prevents unauthorized access while preserving account information for audit purposes.
- Locating the Account Navigate to Stacy’s account location in Active Directory Users and Computers. This might be in the Users container or within the MarketingOU, depending on your organization’s structure.
- Disabling Procedure Right-click on Stacy’s account and select “Disable Account” from the context menu. Confirm this action when prompted. This step immediately prevents any new login attempts while maintaining the account’s existence in Active Directory.
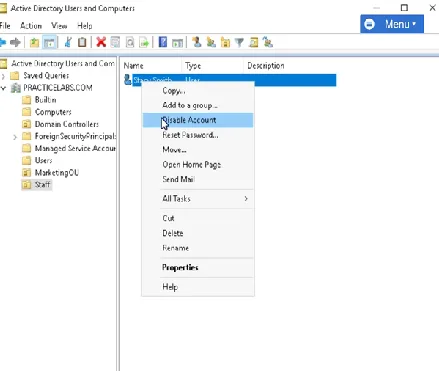
- Session Management Remember that disabling an account doesn’t automatically terminate active sessions. If Stacy is currently logged in, her session will continue until she logs out. For immediate access termination, use Task Manager’s Users tab or PowerShell commands to force a logout.
Best Practices and Security Considerations
Throughout these Active Directory management tasks, several key principles ensure secure and efficient administration:
- Documentation Importance Maintain detailed records of all Active Directory changes, including the reason for each modification and any relevant ticket numbers.
- Least Privilege Principle Grant only the minimum necessary permissions for users to perform their job functions. Regularly review and audit access levels to ensure they remain appropriate.
- Security Verification After making any changes, verify the results to ensure both security and functionality meet organizational requirements.
- Change Management Follow established change management procedures, especially for significant modifications that might affect multiple users or systems.
Best Practices for Active Directory Setup and Configuration
This comprehensive lab guide demonstrates the interconnected nature of Active Directory management tasks. From initial user creation through account deactivation, each step builds upon previous actions to maintain a secure and well-organized directory structure. By following these procedures and understanding their underlying principles, IT professionals can effectively manage their Active Directory environment while maintaining security and operational efficiency.
What is the first thing I should do when a new employee joins the company and needs access to the network?
The first step is to create a new user account for the employee in Active Directory Users and Computers (ADUC). This involves launching the ADUC console, navigating to the appropriate container (e.g., Users), and using the New User wizard to enter the employee’s first name, last name, full name, and a user logon name (e.g., Stacy.Smith@company.com). You’ll also need to configure a temporary password, ensuring the “User must change password at next logon” option is selected.
Why are security groups important in Active Directory, and how do I add a user to one?
Security groups provide an efficient way to manage access permissions and resource allocation for groups of users. To add a user to a security group, such as the “Marketing” group, access the user’s properties in ADUC, navigate to the “Member Of” tab, click “Add,” search for the desired group, and confirm the membership. This grants the user the necessary permissions associated with that group.
What is an Organizational Unit (OU), and why should I use them?
An Organizational Unit (OU) is a container within Active Directory that allows you to organize users, groups, computers, and other objects logically. OUs are crucial for applying Group Policy Objects (GPOs) to specific sets of users and computers, delegating administrative control to department-specific IT staff, and simplifying permission management. Using OUs provides a hierarchical structure that allows administrators to apply policies once at the OU level, affecting all contained objects automatically.
What is the process for resetting a user’s password in Active Directory?
To reset a user’s password, locate their account in ADUC, right-click, and select “Reset Password.” Enter a new temporary password that meets your organization’s complexity requirements, and ensure “User must change password at next logon” is selected. Communicate the temporary password to the user securely and inform them to change it upon their next login.
What steps should I take when an employee leaves the company to ensure network security?
When an employee departs, you must disable their Active Directory account. Locate the account in ADUC, right-click, and select “Disable Account.” This prevents any new login attempts using that account. Remember that disabling an account doesn’t automatically terminate active sessions, so consider forcing a logout using Task Manager or PowerShell if immediate access termination is required.


