Deploying infrastructure in a consistent, reliable manner is difficult — it requires people to follow documented procedures without taking any undocumented shortcuts. Plus, it can be difficult to deploy infrastructure out-of-hours when less staff are available. AWS CloudFormation changes this by defining infrastructure in a template that can be automatically deployed — even on an automated schedule.
This lab provides experience in deploying and editing CloudFormation stacks. It is an interactive experience, requiring you to consult documentation to discover how to define resources within a CloudFormation template.
The lab will demonstrate how to:
- Deploy an AWS CloudFormation stack with a defined Virtual Private Cloud (VPC), and Security Group.
- Configure an AWS CloudFormation stack with resources, such as an Amazon Simple Storage Solution (S3) bucket and Amazon Elastic Compute Cloud (EC2).
- Terminate an AWS CloudFormation and its respective resources.
Step 1: Deploy a CloudFormation Stack
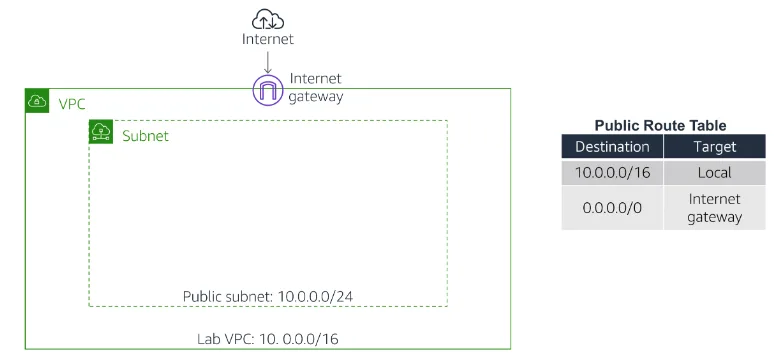
You will begin by deploying a CloudFormation stack that creates a VPC as shown in this diagram:
- This is CloudFormation template:
AWSTemplateFormatVersion: 2010-09-09
Description: Lab template

# Lab VPC with public subnet and Internet Gateway

Parameters:

  LabVpcCidr:
    Type: String
    Default: 10.0.0.0/20

  PublicSubnetCidr:
    Type: String
    Default: 10.0.0.0/24

Resources:

###########
# VPC with Internet Gateway
###########

  LabVPC:
    Type: AWS::EC2::VPC
    Properties:
      CidrBlock: !Ref LabVpcCidr
      EnableDnsSupport: true
      EnableDnsHostnames: true
      Tags:
        - Key: Name
          Value: Lab VPC

  IGW:
    Type: AWS::EC2::InternetGateway
    Properties:
      Tags:
        - Key: Name
          Value: Lab IGW

  VPCtoIGWConnection:
    Type: AWS::EC2::VPCGatewayAttachment
    DependsOn:
      - IGW
      - LabVPC
    Properties:
      InternetGatewayId: !Ref IGW
      VpcId: !Ref LabVPC

###########
# Public Route Table
###########

  PublicRouteTable:
    Type: AWS::EC2::RouteTable
    DependsOn: LabVPC
    Properties:
      VpcId: !Ref LabVPC
      Tags:
        - Key: Name
          Value: Public Route Table

  PublicRoute:
    Type: AWS::EC2::Route
    DependsOn:
      - PublicRouteTable
      - IGW
    Properties:
      DestinationCidrBlock: 0.0.0.0/0
      GatewayId: !Ref IGW
      RouteTableId: !Ref PublicRouteTable

###########
# Public Subnet
###########

  PublicSubnet:
    Type: AWS::EC2::Subnet
    DependsOn: LabVPC
    Properties:
      VpcId: !Ref LabVPC
      MapPublicIpOnLaunch: true
      CidrBlock: !Ref PublicSubnetCidr
      AvailabilityZone: !Select
        - 0
        - !GetAZs
          Ref: AWS::Region
      Tags:
        - Key: Name
          Value: Public Subnet

  PublicRouteTableAssociation:
    Type: AWS::EC2::SubnetRouteTableAssociation
    DependsOn:
      - PublicRouteTable
      - PublicSubnet
    Properties:
      RouteTableId: !Ref PublicRouteTable
      SubnetId: !Ref PublicSubnet

###########
# App Security Group
###########

  AppSecurityGroup:
    Type: AWS::EC2::SecurityGroup
    DependsOn: LabVPC
    Properties:
      GroupName: App
      GroupDescription: Enable access to App
      VpcId: !Ref LabVPC
      SecurityGroupIngress:
        - IpProtocol: tcp
          FromPort: 80
          ToPort: 80
          CidrIp: 0.0.0.0/0
      Tags:
        - Key: Name
          Value: App

###########
# Outputs
###########

Outputs:

  LabVPCDefaultSecurityGroup:
    Value: !Sub ${LabVPC.DefaultSecurityGroup}
- Open this file in a Text Editor (not a Word Processor). Look through the file. You will notice several sections:
- The Parameters section is used to prompt for inputs that can be used elsewhere in the template. The template is asking for two IP address (CIDR) ranges for defining the VPC. The Resources section is used to define the infrastructure to be deployed. The template is defining the VPC, and a Security Group. The Outputs section is used to provide selective information about resources in the stack. The template is providing the Default Security Group for the VPC that is created.
- In the AWS Management Console, on the Services menu, click CloudFormation.
- Click Create stack then:
- Click Upload a template fileClick Browse or Choose file and upload the template file you downloaded earlierClick Next
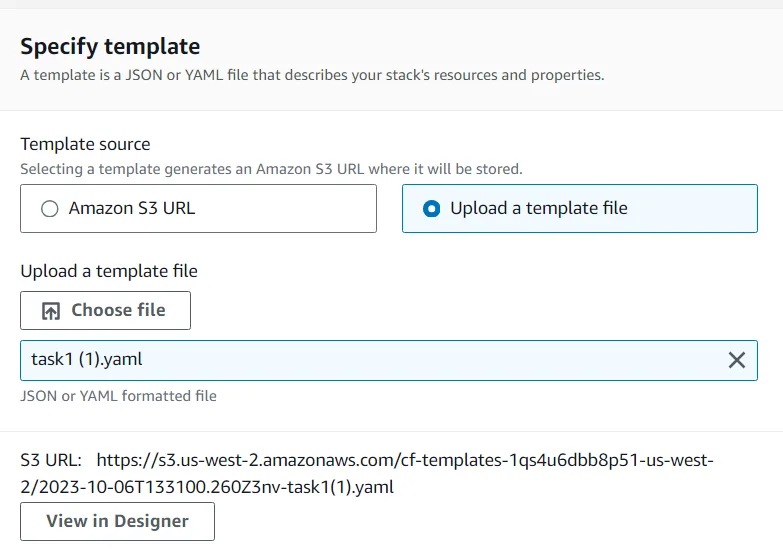
- On the Specify Details page, configure:
- Stack name:
LabIn the Parameters section, you will see that CloudFormation is prompting for the IP address (‘CIDR’) range for the VPC and Subnet. A default value has been specified by the template, so there is no need to modify these values.
- Stack name:
- Click Next The Options page can be used to specify additional parameters. You can browse the page, but leave settings at their default values.
- Click Next The Review page displays a summary of all settings. Some of the resources are defined with custom names, which can lead to naming conflicts. Therefore, CloudFormation prompts for an acknowledgement that custom names are being used.
- Click Create stack The stack will now enter the CREATE_IN_PROGRESS status.
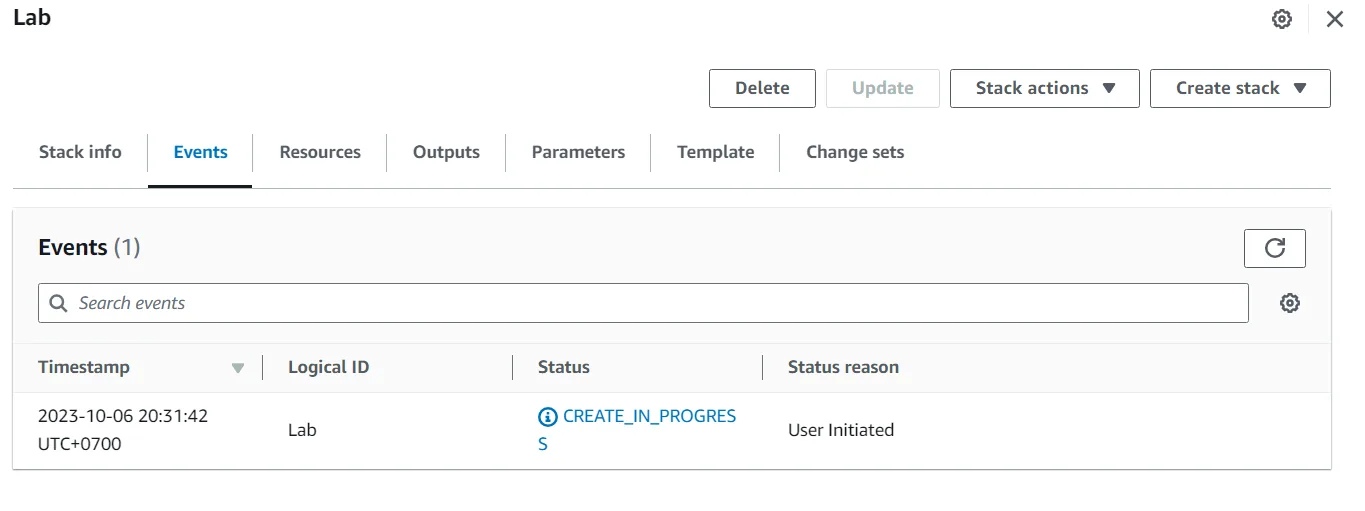
- Click the Events tab and scroll through the listing. The listing shows (in reverse order) the activities performed by CloudFormation, such as starting to create a resource and then completing the resource creation. Any errors encountered during the creation of the stack will be listed in this tab.
- Click the Resources tab. The listing shows the resources that are being created. CloudFormation determines the optimal order for resources to be created, such as creating the VPC before the subnet.
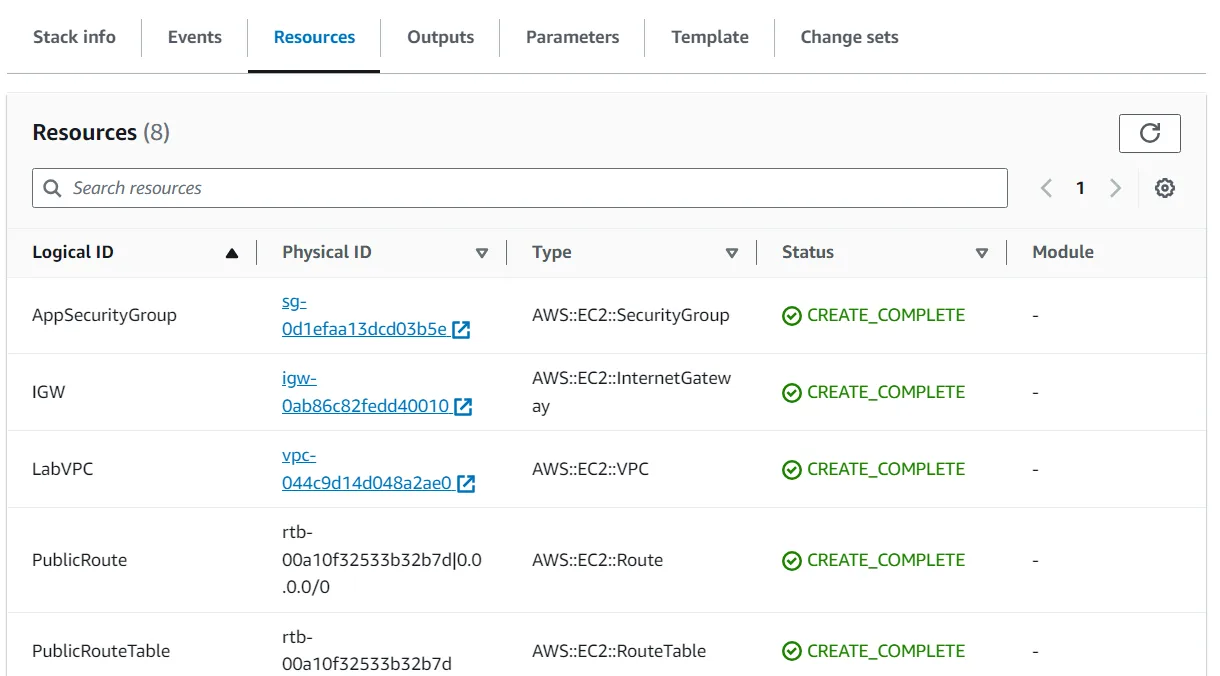
- Wait until the status changes to CREATE_COMPLETE. You can click Refresh occasionally to update the display.
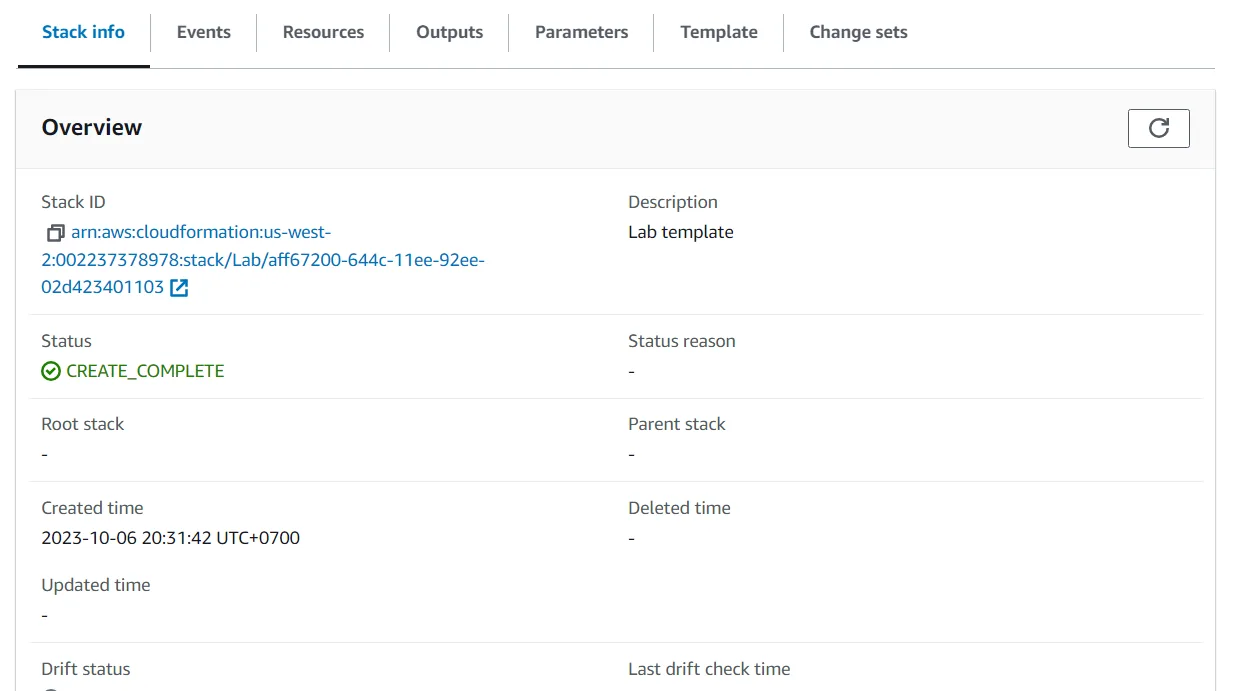
Optional: Go to the VPC console to see the Lab VPC that was created. Then, return to the CloudFormation console.

Step 2: Add an Amazon S3 Bucket to the Stack
In this task, you will gain experience in editing a CloudFormation template.
Your objective is:
- Add an Amazon S3 bucket to the template
- Then update the stack with the revised template
This will result in a new bucket being deployed.
Rather than following pre-defined steps, you will need to discover how to update the template yourself!
Here are some tips:
- You should edit the task1.yaml file you downloaded earlier to include an Amazon S3 bucket
- Use this documentation page for assistance: Amazon S3 Template Snippets
- Look at the YAML example
- Your code should go under the Resources: header in the template file
- You do not require any Properties for this bucket resource
- Indents are important in YAML — use two spaces for each indent
- The correct solution is actually only needs two lines — one for the identifier and one for the Type
AWSTemplateFormatVersion: 2010-09-09
Description: Lab template

# Lab VPC with public subnet and Internet Gateway

Parameters:

  LabVpcCidr:
    Type: String
    Default: 10.0.0.0/20

  PublicSubnetCidr:
    Type: String
    Default: 10.0.0.0/24

Resources:

  Bucket:
    Type: AWS::S3::Bucket

###########
# VPC with Internet Gateway
###########

  LabVPC:
    Type: AWS::EC2::VPC
    Properties:
      CidrBlock: !Ref LabVpcCidr
      EnableDnsSupport: true
      EnableDnsHostnames: true
      Tags:
        - Key: Name
          Value: Lab VPC

  IGW:
    Type: AWS::EC2::InternetGateway
    Properties:
      Tags:
        - Key: Name
          Value: Lab IGW

  VPCtoIGWConnection:
    Type: AWS::EC2::VPCGatewayAttachment
    DependsOn:
      - IGW
      - LabVPC
    Properties:
      InternetGatewayId: !Ref IGW
      VpcId: !Ref LabVPC

###########
# Public Route Table
###########

  PublicRouteTable:
    Type: AWS::EC2::RouteTable
    DependsOn: LabVPC
    Properties:
      VpcId: !Ref LabVPC
      Tags:
        - Key: Name
          Value: Public Route Table

  PublicRoute:
    Type: AWS::EC2::Route
    DependsOn:
      - PublicRouteTable
      - IGW
    Properties:
      DestinationCidrBlock: 0.0.0.0/0
      GatewayId: !Ref IGW
      RouteTableId: !Ref PublicRouteTable

###########
# Public Subnet
###########

  PublicSubnet:
    Type: AWS::EC2::Subnet
    DependsOn: LabVPC
    Properties:
      VpcId: !Ref LabVPC
      MapPublicIpOnLaunch: true
      CidrBlock: !Ref PublicSubnetCidr
      AvailabilityZone: !Select
        - 0
        - !GetAZs
          Ref: AWS::Region
      Tags:
        - Key: Name
          Value: Public Subnet

  PublicRouteTableAssociation:
    Type: AWS::EC2::SubnetRouteTableAssociation
    DependsOn:
      - PublicRouteTable
      - PublicSubnet
    Properties:
      RouteTableId: !Ref PublicRouteTable
      SubnetId: !Ref PublicSubnet

###########
# App Security Group
###########

  AppSecurityGroup:
    Type: AWS::EC2::SecurityGroup
    DependsOn: LabVPC
    Properties:
      GroupName: App
      GroupDescription: Enable access to App
      VpcId: !Ref LabVPC
      SecurityGroupIngress:
        - IpProtocol: tcp
          FromPort: 80
          ToPort: 80
          CidrIp: 0.0.0.0/0
      Tags:
        - Key: Name
          Value: App

###########
# Outputs
###########

Outputs:

  LabVPCDefaultSecurityGroup:
    Value: !Sub ${LabVPC.DefaultSecurityGroup}
Once you have edited the template, continue with the following steps to update the stack.
- In the CloudFormation console, select Lab.
- Click Update.
- Choose Replace current template, then choose Upload a template file. Click Choose file, then browse to and select the task1.yaml file that you modified.
- Click Next If you receive an error message, ask your instructor for assistance in debugging the problem.
- On the Specify stack details page, click Next
- On the Configure stack options page, click Next Wait for CloudFormation to calculate the changes. Towards the bottom of the page, you should see something similar to this:

- This indicates that CloudFormation will Add an Amazon S3 bucket. All other resources defined in the template will be unchanged. This demonstrates that it is fast and easy to add additional resources to an existing stack, since those resources do not need to be redeployed.
- Click Update stack After a minute, the stack status will change from UPDATE_IN_PROGRESS to UPDATE_COMPLETE.
- Click the Resources tab. The bucket will now be displayed in the list of resources. CloudFormation will have assigned it a random name so that it does not conflict with any existing buckets.

Optional: Go to the S3 console to see the bucket that was created. Then, return to the CloudFormation console.
Step 3: Add an Amazon EC2 Instance to the Stack
In this task, your objective is to add an Amazon EC2 instance to the template, then update the stack with the revised template.
Whereas the bucket definition was rather simple (just two lines), defining an Amazon EC2 instance is more complex because it needs to use associated resources, such as an AMI, security group and subnet.
First, however, you will add a special parameter that is used to provide a value for the Amazon Machine Image (AMI).
- Update the template by adding these lines in the Parameters section:
AmazonLinuxAMIID:
    Type: AWS::SSM::Parameter::Value<AWS::EC2::Image::Id>
    Default: /aws/service/ami-amazon-linux-latest/amzn2-ami-hvm-x86_64-gp2
This parameter uses the AWS Systems Manager Parameter Store to retrieve the latest AMI (specified in the Default parameter, which in this case is Amazon Linux 2) for the stack’s region. This makes it easy to deploy stacks in different regions without having to manually specify an AMI ID for every region.
For more details of this method, see: AWS Compute Blog: Query for the latest Amazon Linux AMI IDs using AWS Systems Manager Parameter Store.
When writing CloudFormation templates, you can refer to other resources in the template by using the !Ref keyword. For example, here is a portion of the task1.yaml template that defines a VPC, then references the VPC within the Route Table definition:
VPC:
    Type: AWS::EC2::VPC
    Properties:
      CidrBlock: 10.0.0.0/16

  PublicRouteTable:
    Type: AWS::EC2::RouteTable
    Properties:
      VpcId: !Ref VPC
Note that it uses !Ref VPC to refer to the VPC resource. You will use this technique when defining the EC2 instance.
- Use the tips below to update the template to add an Amazon EC2 instance with the following Properties:
- ImageId: Refer to
AmazonLinuxAMIID, which is the parameter added in the previous step - InstanceType:
t3.micro - SecurityGroupIds: Refer to
AppSecurityGroup, which is defined elsewhere in the template - SubnetId: Refer to
PublicSubnet, which is defined elsewhere in the template - Tags: Use this YAML block:
- ImageId: Refer to
Tags:
        - Key: Name
          Value: App Server
Here are some tips:
- Use this documentation page for assistance: AWS::EC2::Instance
- Use the YAML version
- Your code should go under the Resources: header in the template file
- Only add the five Properties listed above, there is no need to include any other properties
- When referring to other resources in the same template, use
!Ref— see the example at the beginning of this task - When referring to SecurityGroupIds, the template is actually expecting a list of security groups. You therefore need to list the security group like this:
SecurityGroupIds:
- !Ref AppSecurityGroupAWSTemplateFormatVersion: 2010-09-09
Description: Lab template
# Lab VPC with public subnet and Internet Gateway
Parameters:
LabVpcCidr:
Type: String
Default: 10.0.0.0/20
PublicSubnetCidr:
Type: String
Default: 10.0.0.0/24
AmazonLinuxAMIID:
Type: AWS::SSM::Parameter::Value<AWS::EC2::Image::Id>
Default: /aws/service/ami-amazon-linux-latest/amzn2-ami-hvm-x86_64-gp2
Resources:
Bucket:
Type: AWS::S3::Bucket
Instance:
Type: AWS::EC2::Instance
Properties:
InstanceType: t3.micro
ImageId: !Ref AmazonLinuxAMIID
SubnetId: !Ref PublicSubnet
SecurityGroupIds:
- !Ref AppSecurityGroup
Tags:
- Key: Name
Value: App Server
###########
# VPC with Internet Gateway
###########
LabVPC:
Type: AWS::EC2::VPC
Properties:
CidrBlock: !Ref LabVpcCidr
EnableDnsSupport: true
EnableDnsHostnames: true
Tags:
- Key: Name
Value: Lab VPC
IGW:
Type: AWS::EC2::InternetGateway
Properties:
Tags:
- Key: Name
Value: Lab IGW
VPCtoIGWConnection:
Type: AWS::EC2::VPCGatewayAttachment
DependsOn:
- IGW
- LabVPC
Properties:
InternetGatewayId: !Ref IGW
VpcId: !Ref LabVPC
###########
# Public Route Table
###########
PublicRouteTable:
Type: AWS::EC2::RouteTable
DependsOn: LabVPC
Properties:
VpcId: !Ref LabVPC
Tags:
- Key: Name
Value: Public Route Table
PublicRoute:
Type: AWS::EC2::Route
DependsOn:
- PublicRouteTable
- IGW
Properties:
DestinationCidrBlock: 0.0.0.0/0
GatewayId: !Ref IGW
RouteTableId: !Ref PublicRouteTable
###########
# Public Subnet
###########
PublicSubnet:
Type: AWS::EC2::Subnet
DependsOn: LabVPC
Properties:
VpcId: !Ref LabVPC
MapPublicIpOnLaunch: true
CidrBlock: !Ref PublicSubnetCidr
AvailabilityZone: !Select
- 0
- !GetAZs
Ref: AWS::Region
Tags:
- Key: Name
Value: Public Subnet
PublicRouteTableAssociation:
Type: AWS::EC2::SubnetRouteTableAssociation
DependsOn:
- PublicRouteTable
- PublicSubnet
Properties:
RouteTableId: !Ref PublicRouteTable
SubnetId: !Ref PublicSubnet
###########
# App Security Group
###########
AppSecurityGroup:
Type: AWS::EC2::SecurityGroup
DependsOn: LabVPC
Properties:
GroupName: App
GroupDescription: Enable access to App
VpcId: !Ref LabVPC
SecurityGroupIngress:
- IpProtocol: tcp
FromPort: 80
ToPort: 80
CidrIp: 0.0.0.0/0
Tags:
- Key: Name
Value: App
###########
# Outputs
###########
Outputs:
LabVPCDefaultSecurityGroup:
Value: !Sub ${LabVPC.DefaultSecurityGroup}- Once you have edited the template, update the stack with your revised template file. You should see this before deploying the update:


Task 4: Delete the Stack
When a CloudFormation stack is deleted, CloudFormation will automatically delete the resources that it created.
You will now delete the stack.
- In the CloudFormation console, select Lab.
- Click Delete, then at the prompt, click Delete stack. The stack will show DELETE_IN_PROGRESS. After a few minutes, the stack will disappear.
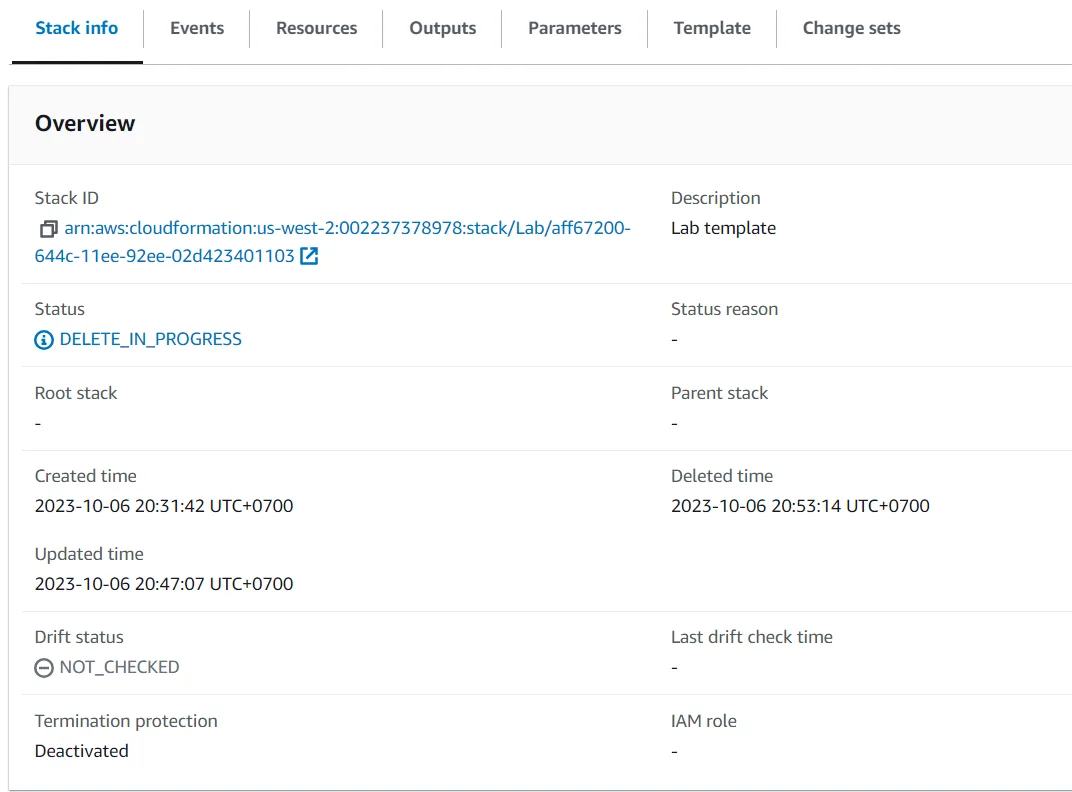
Optional: Verify that the Amazon S3 bucket, Amazon EC2 instance and the VPC have been deleted.
What is AWS CloudFormation, and how is it different from manual infrastructure deployment?
AWS CloudFormation is an Infrastructure as Code (IaC) service that revolutionizes how organizations manage cloud resources. Unlike traditional manual deployment methods that require clicking through multiple console screens and risking human error, CloudFormation allows you to model, provision, and manage AWS resources using declarative templates.
The service stands out by providing comprehensive benefits that transform infrastructure management. It ensures consistent and repeatable infrastructure creation, enables version-controlled configurations, and automates complex resource management. Organizations can deploy intricate architectural designs with a single template, dramatically reducing deployment complexity and time. The built-in rollback and error handling mechanisms provide an additional layer of reliability that manual processes simply cannot match.
How Difficult is it to Learn and Implement AWS CloudFormation?
Learning AWS CloudFormation is a progressive journey that becomes more manageable with a strategic approach. While the initial learning curve might seem steep, most IT professionals can become proficient within a few weeks of dedicated practice.
The most effective learning strategy involves starting with simple templates that define basic resources. AWS provides extensive documentation and numerous community resources that can guide newcomers. Professionals should focus on understanding YAML and JSON syntax, familiarizing themselves with AWS resource types, and practicing incrementally by working on small projects.
Utilizing AWS-provided sample templates serves as an excellent learning tool. Online courses, technical blogs, and hands-on workshops can accelerate the learning process. The key is consistent practice and a willingness to experiment with different template configurations.
How does CloudFormation manage infrastructure across different AWS regions and complex architectures?
AWS CloudFormation is exceptionally powerful when it comes to managing complex, multi-region infrastructure deployments. The service offers sophisticated features that enable intricate architectural designs across various geographical regions.
Through nested stack capabilities, cross-stack references, and parameter store integration, CloudFormation allows for dynamic and flexible resource configuration. Organizations can create master templates that intelligently reference regional sub-templates, ensuring consistent yet adaptable infrastructure deployment. The ability to implement conditional resource creation and utilize region-specific mappings means that complex, geographically distributed systems can be managed with remarkable precision.
What Are the Cost Implications of Using AWS CloudFormation?
One of the most attractive aspects of AWS CloudFormation is its cost-effectiveness. The service itself is completely free, with charges applying only to the AWS resources you provision through the templates. This means organizations can leverage powerful infrastructure management capabilities without additional financial overhead.
In fact, CloudFormation often leads to potential cost savings by reducing manual configuration time and enabling more efficient resource management. The ability to quickly spin up and tear down environments allows teams to optimize their cloud spending. By providing a structured approach to infrastructure deployment, CloudFormation helps prevent overprovisioning and supports more strategic resource allocation.
How Does AWS CloudFormation Integrate with Existing DevOps Tools?
AWS CloudFormation is designed with integration in mind, offering seamless compatibility with a wide range of DevOps tools and continuous integration practices. The service directly integrates with AWS CodePipeline and works harmoniously with popular continuous integration platforms like Jenkins, GitLab CI, and GitHub Actions.
By treating infrastructure templates as code, CloudFormation becomes a natural component of modern continuous integration and continuous deployment workflows. The ability to validate infrastructure through linting tools, version control templates, and interface with configuration management systems makes it an incredibly flexible solution for organizations of all sizes.
