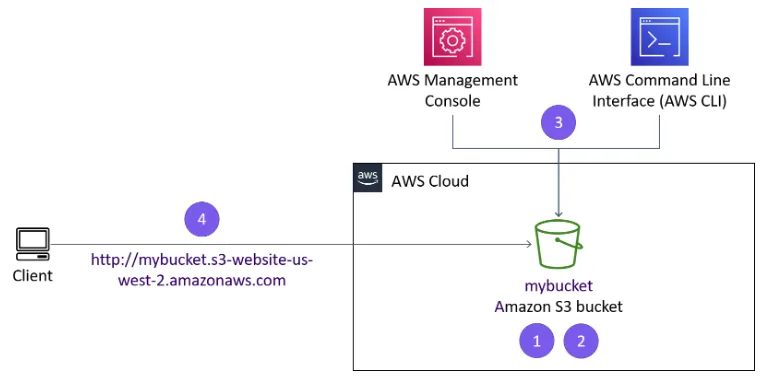
In today’s digital landscape, having a web presence is crucial for any business or organization. While there are many ways to host a website, Amazon Web Services (AWS) offers a cost-effective and scalable solution through its Simple Storage Service (S3). This guide will walk you through the process of deploying a static website using AWS services, specifically designed for small to medium-sized businesses looking to establish their online presence.
This project will demonstrate how to leverage AWS Command Line Interface (AWS CLI) to create and manage your website hosting infrastructure. We’ll cover everything from initial setup to automated deployment processes, ensuring you have a professional and maintainable web presence.
Understanding Amazon S3: The Foundation of Cloud Storage
Amazon Simple Storage Service (S3) represents a fundamental shift in how we think about and manage data storage in the cloud. To truly appreciate its capabilities, let’s explore its architecture, features, and practical applications in detail.
Core Architecture and Design
Amazon S3 operates on a unique object storage architecture that differs significantly from traditional file systems. When you store data in AWS S3, each piece of data becomes an object that can be up to 5 terabytes in size. These objects reside in containers called buckets, but unlike traditional folders, AWS S3 uses a flat structure where all objects exist at the same level.
Each object in AWS S3 consists of:
- The data itself (the file contents)
- A unique identifier (the key)
- Metadata (information about the object)
- Subresources (additional configurations)
- Version ID (if versioning is enabled)
The flat structure of AWS S3 offers several advantages. For instance, when you create what appears to be a folder structure like “photos/2024/january/image.jpg”, AWS S3 actually treats this entire path as part of the object’s key. This approach enables rapid retrieval regardless of how deeply nested an object might appear to be.
Storage Classes and Intelligence
AWS S3 offers various storage classes, each designed for specific use cases:
AWS S3 Standard provides immediate, highly available access to data. Think of it as the premium tier, ideal for frequently accessed data like active website content or application assets. The data is stored redundantly across multiple facilities, offering 99.999999999% (11 nines) durability.
AWS S3 Intelligent-Tiering works like a smart storage manager. It monitors access patterns and automatically moves objects between two access tiers: frequent access and infrequent access. Imagine having a library where books automatically move between easily accessible shelves and storage based on how often they’re read.
AWS S3 Glacier serves as a digital archive, similar to storing documents in a secure vault. While retrieval takes longer (minutes to hours), the storage cost is significantly lower. This makes it perfect for long-term data retention, like maintaining historical records or compliance data.
Advanced Data Management Features
AWS S3’s capabilities extend far beyond simple storage. The service includes sophisticated data management features that transform it into a comprehensive data platform:
Lifecycle Management allows you to create rules that automatically transition objects between storage classes or delete them after specific time periods. For example, you might set up a rule that moves log files to Glacier after 90 days and deletes them after seven years, automating your data retention policies.
Versioning protects against accidental deletions and modifications by maintaining multiple variants of an object. When enabled, instead of replacing an object during an update, AWS S3 creates a new version while preserving the old one. This works similarly to how a document management system keeps track of different drafts of a document.
Event Notifications enable S3 to communicate with other AWS services when specific actions occur. For instance, when a new image is uploaded to your bucket, S3 could automatically trigger a Lambda function to create a thumbnail or notify an administrator via SNS.
Security and Access Control
AWS S3’s security model operates on multiple levels, providing defense in depth:
Bucket Policies function as the primary gateway to your S3 resources. Written in JSON, these policies define who can do what with the bucket and its contents. For example, you might create a policy that allows public read access to website files while restricting write access to specific IAM users.
Access Control Lists (ACLs) provide object-level permissions, though AWS now recommends using bucket policies and IAM roles instead. ACLs can still be useful in specific scenarios, such as granting access to objects owned by different AWS accounts.
Access Points simplify managing access for applications with different permission requirements. Think of access points as specialized entrances to your bucket, each with its own security configuration. This allows you to create one access point for your website content with public read access and another for your content management system with write permissions.
Performance Optimization
AWS S3 incorporates several features to optimize performance:
Transfer Acceleration leverages Amazon’s global network infrastructure to speed up file uploads and downloads. It works by routing transfers through Amazon CloudFront’s edge locations, similar to how a highway system provides faster travel compared to local roads.
Multipart Upload breaks large files into smaller chunks that can be uploaded in parallel. This not only improves upload speed but also provides resilience against network issues. If one part fails to upload, only that part needs to be retried rather than the entire file.
These features make AWS S3 particularly well-suited for applications requiring both high performance and scalability, from simple website hosting to complex data lakes and application backends.
Prerequisites and Environment Setup
Before diving into the website deployment process, you’ll need to ensure your development environment is properly configured. This section covers the essential preparations required for a smooth deployment process.
Required Tools and Access
To successfully complete this project, you’ll need:
- An AWS account with administrative access
- A computer with SSH capabilities
- Access to a terminal or command prompt
- Basic understanding of command line operations
- Familiarity with web technologies (HTML, CSS)
Establishing a Secure Connection
The first crucial step in our process is establishing a secure connection to our AWS environment. This involves connecting to an Amazon EC2 instance that will serve as our deployment platform. We’ll use SSH (Secure Shell) for this purpose, ensuring all our operations are conducted securely.
For Windows users, the connection process involves using PuTTY, a popular SSH client. Here’s the detailed process:
Setting up PuTTY requires careful attention to several configuration details. First, you’ll need to configure the session timeout settings to maintain a stable connection throughout your work. Begin by setting the keepalive interval to 30 seconds. This seemingly small detail is crucial for maintaining an uninterrupted workflow, as it prevents your session from timing out during extended operations.
When configuring your SSH connection, you’ll need to specify the host information and authentication method. Use the public IP address provided for your EC2 instance as the host name. The authentication process utilizes a public-private key pair system, which offers superior security compared to password-based authentication. Load your private key file (labuser.ppk) through PuTTY’s authentication settings to enable secure access.
For macOS and Linux users, the connection process differs slightly but follows similar security principles. The process involves:
- Downloading the private key (labsuser.pem)
- Setting appropriate permissions on the key file using chmod 400
- Connecting via the terminal using the ssh command with the -i flag to specify the identity file
Regardless of your operating system, successful connection to the EC2 instance will place you in a secure environment from which you can execute AWS CLI commands to manage your website deployment.
AWS CLI Configuration
The AWS Command Line Interface serves as your primary tool for interacting with AWS services throughout this project. While Amazon Linux instances come with AWS CLI pre-installed, proper configuration is essential for secure and effective operation.
In the SSH session terminal window, run the configure command to update the AWS CLI software with credentials.
aws configureAt the prompt, configure the following:
- AWS Access Key ID: Choose the Details dropdown list, and choose Show. Copy and paste the AccessKey value into the terminal window.
- AWS Secret Access Key: Copy and paste the SecretKey value into the terminal window.
- Default region name: Enter
us-west-2 - Default output format: Enter
json
Create an AWS S3 Bucket using the AWS CLI
The s3api command creates a new S3 bucket with the AWS credentials in this lab. By default, the S3 bucket is created in the us-east-1 Region.
Tip: In this lab, you might use the s3api command or the s3 command. s3 commands are built on top of the operations that are found in the s3api commands.
When you create a new S3 bucket, the bucket must have a unique name, such as the combination of your first initial, last name, and three random numbers. For example, if a user’s name is Terry Whitlock, a bucket name could be twhitlock256
To create a bucket in Amazon S3, you use the aws s3api create-bucket command. When you use this command to create an S3 bucket, you also include the following:
- Specify
-region us-west-2 - Add
-create-bucket-configuration LocationConstraint=us-west-2to the end of the command.
twhitlock256 as your bucket name, or you can replace <twhitlock256> with a bucket name that you prefer to use for this lab.
aws s3api create-bucket --bucket <twhitlock256> --region us-west-2 --create-bucket-configuration LocationConstraint=us-west-2If the command is successful, you will get a JSON-formatted response with a Location name-value pair, where the value reflects the bucket name. The following is an example:
{
		"Location": "http://twhitlock256.s3.amazonaws.com/"
}
Create a new IAM user that has full access to Amazon S3
The AWS CLI command: aws iam create-user creates a new IAM user for your AWS account. The option --user-name is used to create the name of the user and must be unique within the account.
Using the AWS CLI, create a new IAM user with the command aws iam create-user and username awsS3user:
aws iam create-user --user-name awsS3user
Create a login profile for the new user by using the following command:
aws iam create-login-profile --user-name awsS3user --password Training123!
Copy the AWS account number:
- In the AWS Management Console, choose the account voclabs/user… drop down menu located at the top right of the screen.
- Copy the 12 digit Account ID number.
- In the current drop down menu, choose Sign Out.
Log in to the AWS Management Console as the new awsS3user user:
- In the browser tab where you just signed out of the AWS Management Console, choose Log back in or Sign in to the Console.
- In the sign-in screen, choose the radio button IAM user.
- In the text field, paste or enter the account ID with no dashes.
- Choose Next.
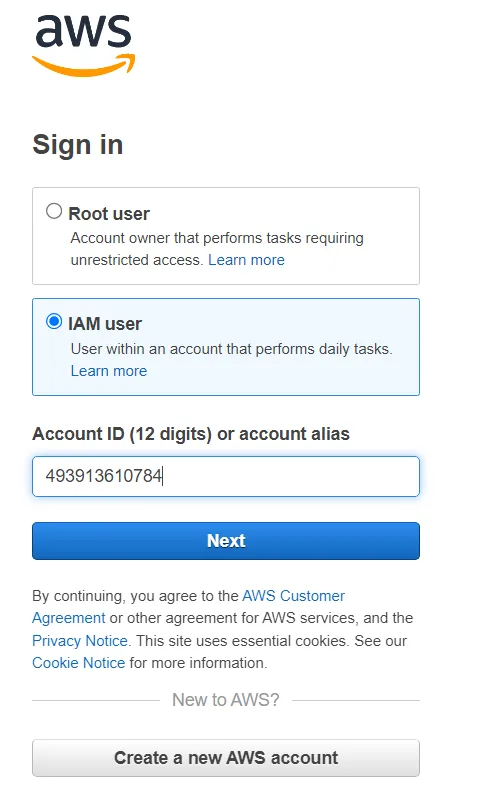
- A new login screen with Sign in as IAM user field will show. The account ID will be filled in from the previous screen.
- For IAM user name, enter
awsS3user - For Password, enter
<Your Password> - Choose Sign In
On the AWS Management Console, in the Search box, enter S3 and choose S3. This option takes you to the Amazon S3 console page.
Note: The bucket that you created might not be visible. Refresh the Amazon S3 console page to see if it appears. The awsS3user user does not have Amazon S3 access to the bucket that you created, so you might see an error for Access to this bucket.
In the terminal window, to find the AWS managed policy that grants full access to Amazon S3, run the following command:
aws iam list-policies --query "Policies[?contains(PolicyName,'S3')]"The result displays policies that have a PolicyName attribute containing the term S3. Locate the policy that grants full access to Amazon S3. You use this policy in the next step.
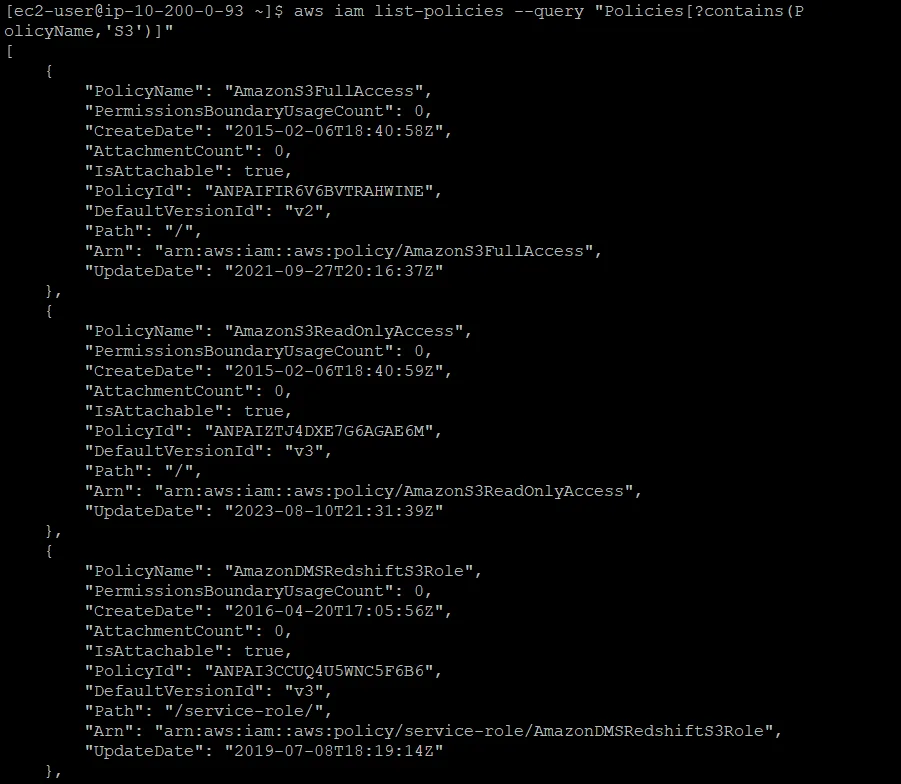
To grant the awsS3user user full access to the S3 bucket, replace <policyYouFound> in following command with the appropriate PolicyName from the results, and run the adjusted command:
aws iam attach-user-policy --policy-arn arn:aws:iam::aws:policy/<policyYouFound> --user-name awsS3userReturn to the AWS Management Console, and refresh the browser tab.
If you implemented the correct policy, the Access portion of the bucket now has Objects can be public.

Managing and Deploying Website Content
The process of deploying website content to AWS S3 involves several crucial steps that ensure your files are properly organized, accessible, and maintainable. Understanding these steps helps create a robust and professional web presence.
Preparing Your Website Files
Before uploading content to S3, proper file organization is essential. In our example, we’ll work with a pre-packaged website structure that follows web development best practices. The website files are contained in a compressed archive that needs to be extracted and organized.
When you execute the command to extract the files:
cd ~/sysops-activity-files
tar xvzf static-website-v2.tar.gz
cd static-website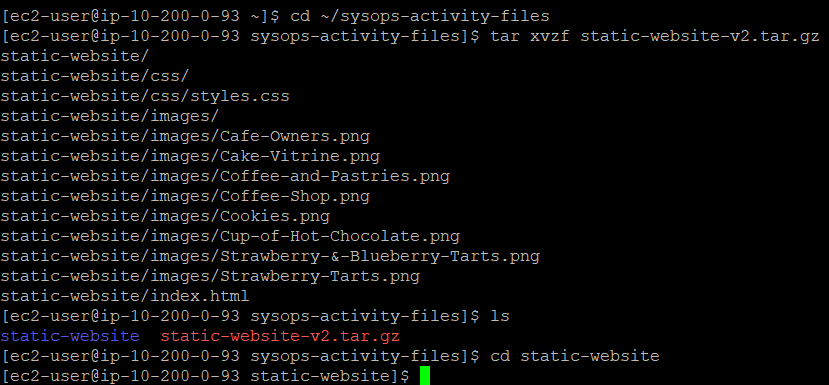
This sequence of commands accomplishes several important tasks. The ‘cd’ command navigates to the directory containing your website files. The ‘tar’ command with the ‘xvzf’ options performs the extraction:
- ‘x’ tells tar to extract files
- ‘v’ enables verbose output, showing each file as it’s extracted
- ‘z’ handles gzip compression
- ‘f’ indicates we’re working with a file
After extraction, you should see a structured directory containing:
- index.html: The main entry point for your website
- css/: A directory containing your site’s styling files
- images/: A directory containing your site’s visual assets

This organization follows web development conventions, making your site easier to maintain and update.
Configuring S3 for Website Hosting
Converting a standard S3 bucket into a web hosting platform requires specific configuration. The command:
aws s3 website s3://your-bucket-name/ --index-document index.htmlThis command does more than just enable website hosting. It establishes important behaviors:
- Defines index.html as the default document served when visitors access your site’s root URL
- Enables the bucket to respond to HTTP requests like a web server
- Creates a public endpoint for your website
Uploading Content with Proper Permissions
The process of uploading files to S3 must account for both file transfer and public accessibility. The command:
aws s3 cp /home/ec2-user/sysops-activity-files/static-website/ s3://your-bucket-name/ --recursive --acl public-readThis command incorporates several crucial elements:
- The ‘cp’ command initiates a copy operation
- ‘–recursive’ ensures all subdirectories and their contents are included
- ‘–acl public-read’ sets appropriate permissions for web hosting
The ACL (Access Control List) setting is particularly important. Setting ‘public-read’ permissions allows anyone to view your website files, which is necessary for a public website. However, this setting should be used thoughtfully, as it makes your content publicly accessible.
Create a Batch File to Make Updating the Website Repeatable
To create a repeatable deployment, you create a batch file by using the VI editor.
In the terminal window, to pull up the history of recent commands, run the following command:
historyLocate the line where you ran the aws s3 cp command. You will put this line in your new batch file.
To change directories and create an empty file, run the following command in the SSH terminal session:
cd ~touch update-website.shTo open the empty file in the VI editor, run the following command.
vi update-website.shTo enter edit mode in the VI editor, press i
Next, you add the standard first line of a bash file and then add the s3 cp line from your history. To do so, replace <your-bucket-name> in the following command with your bucket name, and copy and paste the adjusted command into your file:
#!/bin/bash
aws s3 cp /home/ec2-user/sysops-activity-files/static-website/ s3://<your-bucket-name>/ --recursive --acl public-read
To write the changes and quit the file, press Esc, enter :wq and then press Enter.
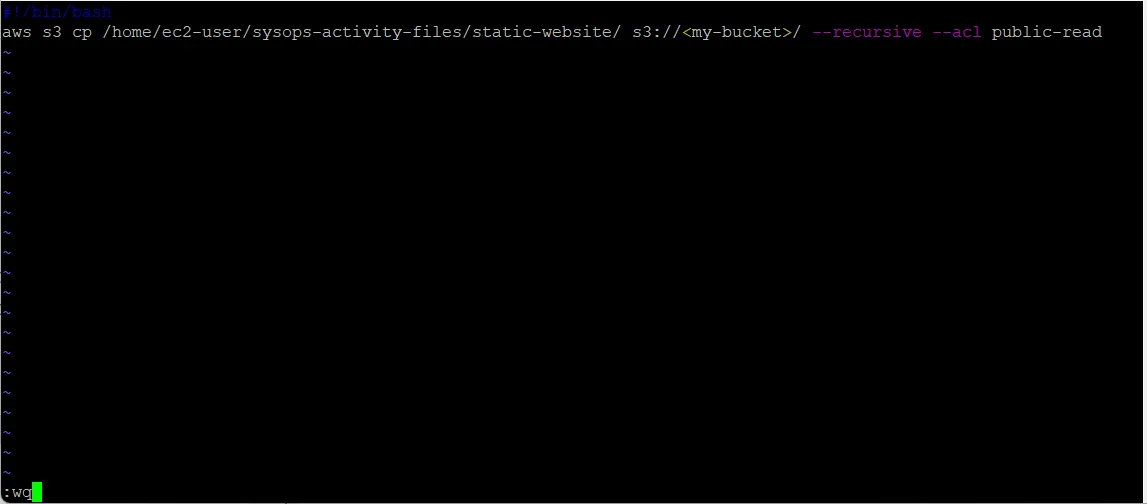
To make the file an executable batch file, run the following command:
chmod +x update-website.shTo open the local copy of the index.html file in a text editor, run the following command:
vi sysops-activity-files/static-website/index.html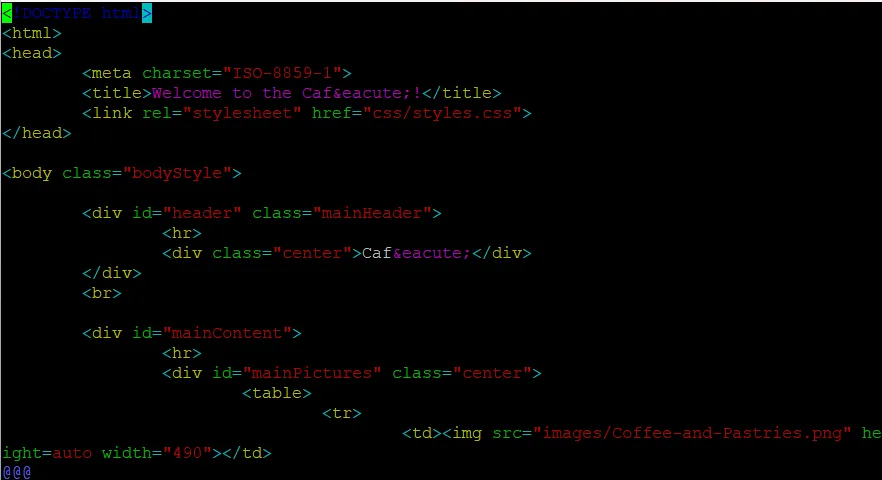
To enter edit mode in the VI editor, press i and modify the file as follows:
- Locate the first line that has the HTML code bgcolor=”aquamarine” and change this code to
bgcolor="gainsboro" - Locate the line that has the HTML code bgcolor=”orange” and change this code to
bgcolor="cornsilk" - Locate the second line that has the HTML code bgcolor=”aquamarine” and change this code to
bgcolor="gainsboro" - To write the changes and quit the file, press Esc, enter
:wqand then press Enter.
To update the website, run your batch file.
./update-website.shNote: The command line output should show that the files were copied to Amazon S3.
Congratulations, you just made your first revision to the website!
You now have a tool (the script that you created) that you can use to push changes from your website source files to Amazon S3.
Testing and Validation
After deployment, thorough testing is essential. Access your website through the bucket’s website endpoint URL, which follows the format: http://your-bucket-name.s3-website-us-west-2.amazonaws.com
Test various aspects of your site:
- Verify all pages load correctly
- Check that images and styles are properly applied
- Ensure links work as expected
- Test across different browsers and devices
Maintaining and Securing Your AWS-Hosted Website
A successful website deployment is just the beginning. Long-term success requires careful attention to maintenance, security, and optimization. Let’s explore these crucial aspects in detail.
Implementing a Robust Maintenance Strategy
Website maintenance extends beyond simply updating content. A comprehensive maintenance strategy ensures your website remains secure, performs well, and continues to meet your organization’s needs.
Version Control Integration
While our basic deployment script works well for simple updates, integrating version control adds an extra layer of safety and accountability. Consider creating a Git repository for your website files. This approach provides several advantages:
When you maintain your website files in a Git repository, you gain the ability to track changes over time, roll back problematic updates, and collaborate effectively with team members. A basic Git workflow might look like this:
# Initialize Git repository (one-time setup)
git init
git add .
git commit -m "Initial website setup"

# For each update
git add [changed-files]
git commit -m "Descriptive message about changes"
git push origin main
You can then enhance your deployment script to pull from the Git repository before uploading to S3:
#!/bin/bash
# Pull latest changes
git pull origin main

# Sync with S3
aws s3 sync . s3://your-bucket-name/ --acl public-read --exclude ".git/*"
Monitoring and Analytics Integration
Understanding how your website performs and how visitors interact with it is crucial. AWS provides several tools for monitoring your static website:
Amazon CloudWatch can monitor your S3 bucket’s metrics, including:
- Number of requests
- Data transfer volumes
- Error rates
- Latency statistics
To enable basic monitoring, you can use the AWS CLI:
aws cloudwatch put-metric-alarm \
    --alarm-name "HighErrorRate" \
    --alarm-description "Alarm when error rate exceeds threshold" \
    --metric-name 4xxErrors \
    --namespace AWS/S3 \
    --statistic Average \
    --period 300 \
    --threshold 10 \
    --comparison-operator GreaterThanThreshold \
    --evaluation-periods 2 \
    --dimensions Name=BucketName,Value=your-bucket-name
Advanced Security Considerations
While our initial setup provides basic security, additional measures can enhance your website’s protection.
Implementing Bucket Policies
A more sophisticated approach to S3 bucket security involves using bucket policies. These policies provide fine-grained access control. Here’s an example of a secure bucket policy:
{
    "Version": "2012-10-17",
    "Statement": [
        {
            "Sid": "PublicReadGetObject",
            "Effect": "Allow",
            "Principal": "*",
            "Action": "s3:GetObject",
            "Resource": "arn:aws:s3:::your-bucket-name/*",
            "Condition": {
                "IpAddress": {
                    "aws:SourceIp": [
                        "203.0.113.0/24",
                        "2001:DB8::/32"
                    ]
                }
            }
        }
    ]
}
This policy allows public access while implementing IP-based restrictions. You can apply it using:
aws s3api put-bucket-policy --bucket your-bucket-name --policy file://bucket-policy.jsonEnabling Encryption
Although static website content is public, enabling encryption adds an extra layer of protection during file transfer and storage:
aws s3api put-bucket-encryption \
    --bucket your-bucket-name \
    --server-side-encryption-configuration '{
        "Rules": [
            {
                "ApplyServerSideEncryptionByDefault": {
                    "SSEAlgorithm": "AES256"
                }
            }
        ]
    }'
Troubleshooting Common Issues
Even with careful planning, issues can arise. Here are some common problems and their solutions:
Access Denied Errors
If visitors receive access denied errors, verify:
- Bucket policy permissions
- Object ACLs
- Public access settings at the bucket and account level
The following command can help diagnose bucket permissions:
aws s3api get-bucket-acl --bucket your-bucket-name
aws s3api get-bucket-policy --bucket your-bucket-name
Performance Issues
If your website loads slowly:
- Check file sizes and implement compression
- Verify you’re using the correct region
- Consider implementing CloudFront distribution
You can analyze object sizes using:
aws s3api list-objects --bucket your-bucket-name --query 'Contents[].{Key: Key, Size: Size}'Future Enhancements
As your website grows, consider these advanced features:
- Content Delivery Network (CDN)
- Implement AWS CloudFront for improved performance
- Enable caching for faster content delivery
- Provide HTTPS security through SSL/TLS certificates
- Automated Testing
- Implement automated checks for broken links
- Validate HTML and CSS
- Test mobile responsiveness
- Backup and Disaster Recovery
- Enable versioning on your S3 bucket
- Implement cross-region replication
- Create automated backup procedures
How Can I Deploy a Static Website on AWS Using S3?
Deploying a static website on AWS S3 provides a scalable and cost-effective hosting solution. First, you need to create an S3 bucket and enable static website hosting. The bucket acts as a storage location for your website files. After that, you upload your HTML, CSS, and JavaScript files and set appropriate permissions to allow public access. To ensure users can access your site, you need to configure the bucket policy to grant read permissions to all visitors. Once everything is set up, your website will be accessible via the S3 website endpoint. This method is particularly useful for businesses looking to establish an online presence without the complexity of managing servers.
What Are the Best Practices for Securing an AWS S3 Static Website?
Security is a critical aspect of hosting websites on AWS S3. One of the first steps is to ensure that public access is only enabled for necessary files by configuring bucket policies and access control lists (ACLs). Encryption should also be implemented using AWS’s server-side encryption (SSE), which protects data at rest. Additionally, AWS Identity and Access Management (IAM) roles should be used to grant permissions instead of relying on broad public access. To further enhance security, enabling S3 access logs helps monitor unauthorized activities, and integrating AWS CloudFront as a Content Delivery Network (CDN) can provide DDoS protection and HTTPS support. Keeping these best practices in place ensures that your website remains secure and resilient.
How Do I Automate Static Website Deployment on AWS S3?
Automating deployments streamlines the process and reduces human error. A simple way to achieve this is by creating a shell script that syncs your local website files with your S3 bucket using the AWS CLI command aws s3 sync. Once this script is set up, making updates becomes as easy as running a single command. For more advanced automation, integrating Git version control allows developers to track changes and deploy only modified files. Additionally, AWS services like CodePipeline and Lambda functions can be used to trigger automatic deployments whenever new files are pushed to a repository. By implementing these techniques, businesses can keep their websites updated with minimal effort.
Why Should I Use AWS S3 for Hosting Instead of Traditional Web Hosting?
AWS S3 offers several advantages over traditional hosting solutions. The most significant benefit is its cost-effectiveness, as it follows a pay-as-you-go pricing model, meaning businesses only pay for the storage and data transfer they use. Another key advantage is high scalability—S3 can handle millions of requests per second without requiring server management. Its 99.999999999% (11 nines) durability ensures that data is highly secure and backed up across multiple locations. Unlike traditional hosting, S3 integrates seamlessly with AWS services such as CloudFront, Route 53, and Lambda, allowing businesses to scale efficiently. These benefits make AWS S3 an ideal choice for static website hosting, especially for startups and enterprises looking for a reliable, low-maintenance solution.
How Do I Optimize My AWS S3 Website for Performance?
Website performance plays a crucial role in user experience and SEO rankings. One effective optimization technique is enabling AWS CloudFront, which caches website files across multiple locations worldwide, reducing latency for users. Another important step is to use Gzip compression to minimize file sizes before uploading them to S3. Adding proper cache-control headers ensures that browsers store static files efficiently, reducing unnecessary reloads. Additionally, Transfer Acceleration speeds up file uploads by utilizing Amazon’s global infrastructure. For media-heavy sites, optimizing images using formats like WebP and implementing adaptive bitrate streaming for videos significantly enhances performance. These improvements collectively ensure a fast-loading, responsive website that meets modern web standards.
How Can I Integrate AWS CloudFront with My S3 Website for Better Performance?
Integrating AWS CloudFront with your S3 static website significantly improves performance, enhances security, and reduces latency by delivering content through a global CDN (Content Delivery Network). CloudFront caches your static files across multiple edge locations worldwide, ensuring that users access data from the nearest server rather than retrieving it directly from your S3 bucket every time.
To set up CloudFront with S3, first, create a new CloudFront distribution and specify your S3 bucket as the origin. When configuring the distribution, enable Origin Access Control (OAC) to securely restrict S3 bucket access to CloudFront, preventing direct access to your content. This ensures that users can only retrieve files through the CloudFront URL, improving security and controlling bandwidth costs.
For optimal performance, configure caching settings and enable Gzip or Brotli compression to minimize file sizes. Additionally, implement cache invalidation rules to update content efficiently when changes are made. If your website requires HTTPS, you can enable SSL/TLS certificates in CloudFront, providing a secure browsing experience without modifying your S3 bucket settings.
Once CloudFront is set up, update your DNS settings in Route 53 (or your domain provider) to point to the CloudFront distribution instead of the S3 bucket URL. This ensures users access the website via the faster, optimized CloudFront network.


