AWS Systems Manager is a robust suite of operational management tools designed to simplify the administration of Amazon Web Services (AWS) infrastructure. By offering centralized control, automation, and real-time insights, Systems Manager empowers businesses to optimize their cloud environments with minimal manual intervention. This article explores a hands-on approach to leveraging AWS Systems Manager for various operational tasks, including inventory management, application deployment, configuration storage, and secure remote access.
Install and Configure the AWS CLI: A Step-by-Step Guide
Understanding AWS Systems Manager
AWS Systems Manager acts as a control hub for operational tasks across AWS environments. It integrates seamlessly with Amazon EC2 instances, on-premises servers, and virtual machines in hybrid cloud settings. The platform’s capabilities extend beyond simple resource tracking; it provides deep visibility into system configurations, enables automation of administrative tasks, and enhances security through controlled access mechanisms.
Through this guide, we will demonstrate how to efficiently use AWS Systems Manager to:
- Collect system inventory information
- Deploy and manage applications
- Store and manage configuration settings securely
- Access instances securely without SSH
Each of these tasks is vital in ensuring streamlined IT operations while reducing overhead and improving security. Let’s dive into the practical applications of AWS Systems Manager.
Task 1: Generating Inventory Lists for Managed Instances
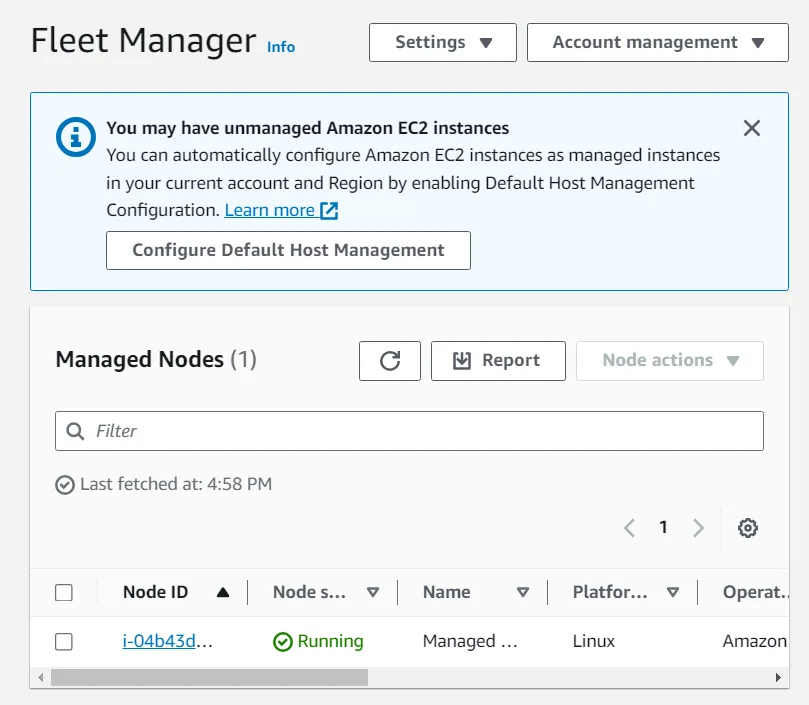
One of the fundamental features of AWS Systems Manager is Fleet Manager, which simplifies the management of servers across various environments. By collecting operating system details, application metadata, and security configurations, Fleet Manager ensures compliance with company policies and helps administrators pinpoint outdated or misconfigured systems.
To begin gathering inventory information from an EC2 instance, navigate to the AWS Management Console and search for Systems Manager. Within the Node Management section, select Fleet Manager. From there, setting up an inventory association is straightforward. The process includes defining a new inventory association, specifying target instances, and enabling automatic inventory collection.
- Choose the Account management dropdown list, and choose Set up inventory.
- To create an association that collects information about software and settings for your managed instance, choose the following options:
- In the Provide inventory details section, for Name, enter
Inventory-AssociationIn the Targets section, choose the following options:- For Specify targets by, choose Manually selecting instances.Select the row for Managed Instance.
- In the Provide inventory details section, for Name, enter
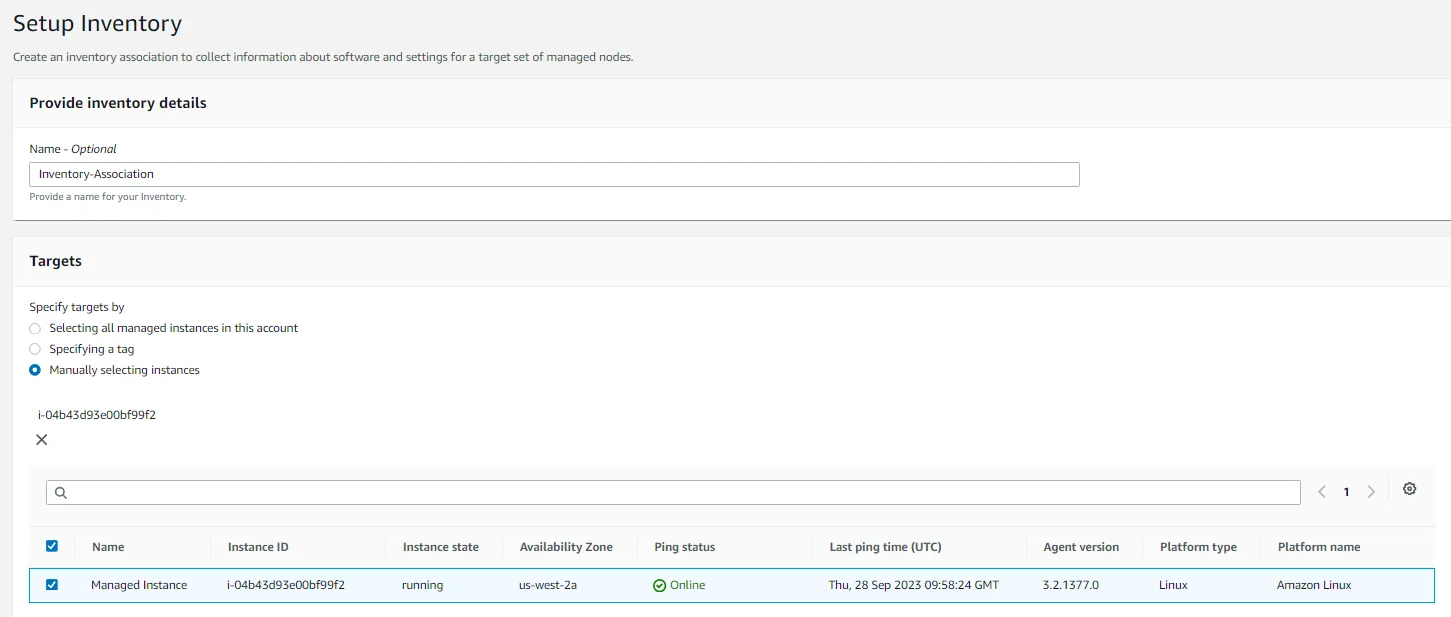
- Choose Setup Inventory A banner with the message “Setup inventory request succeeded” appears on the Fleet Manager page. Inventory, a capability of Systems Manager, now regularly inventories the instance for the selected properties.
- Choose the Node ID link, which directs you to the Node overview.
- Choose the Inventory tab. This tab lists all of the applications in the instance. Take a moment to review the installed applications and other options in the Inventory type dropdown list.
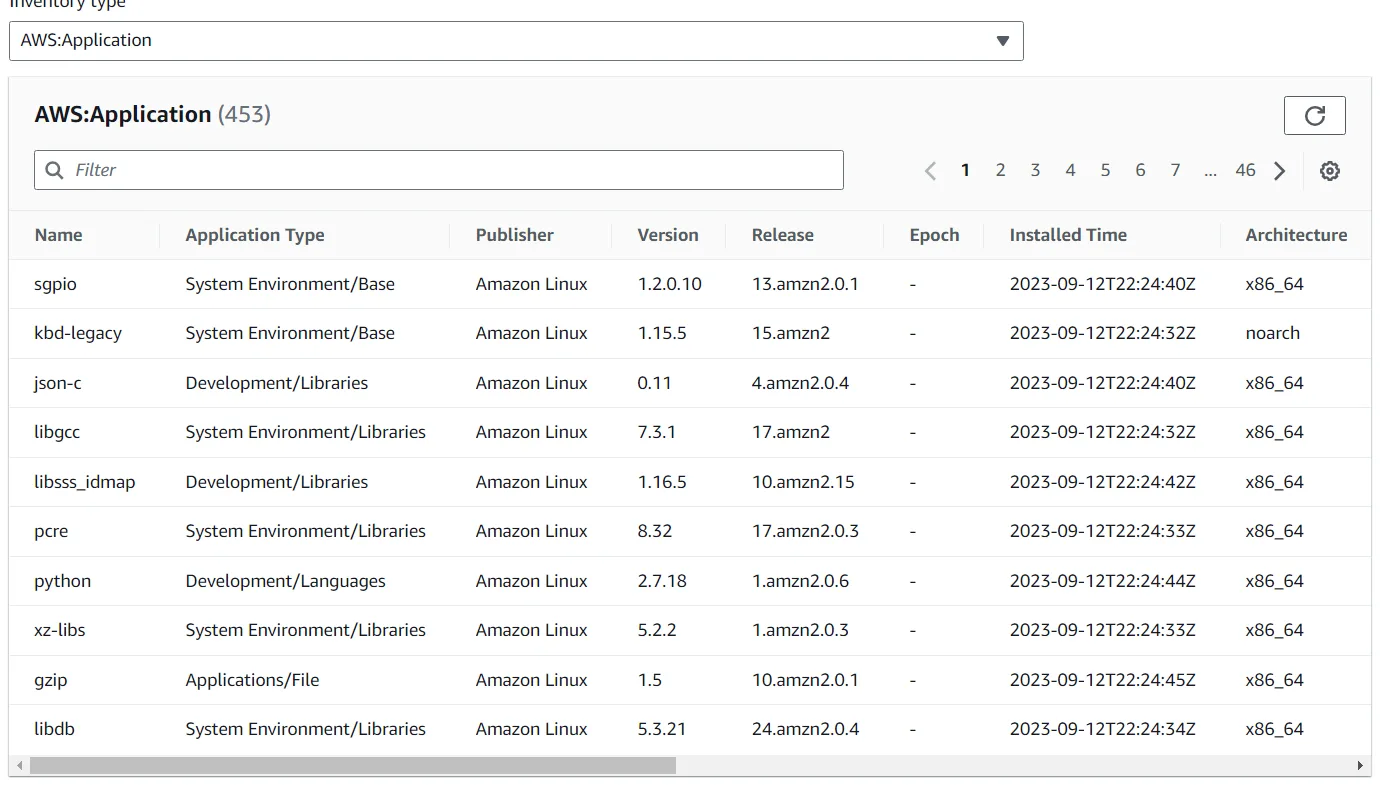
Once the setup is complete, administrators can easily review installed applications, operating system versions, and other critical metadata. This functionality is particularly useful for organizations managing large-scale AWS environments where manual tracking would be impractical. The ability to generate inventory lists in an automated fashion not only saves time but also improves compliance and security posture.
Task 2: Deploying a Custom Web Application Using Run Command
With inventory management in place, the next step involves deploying a custom application using AWS Systems Manager Run Command. This feature allows administrators to execute scripts on managed instances without the need to log in via SSH.
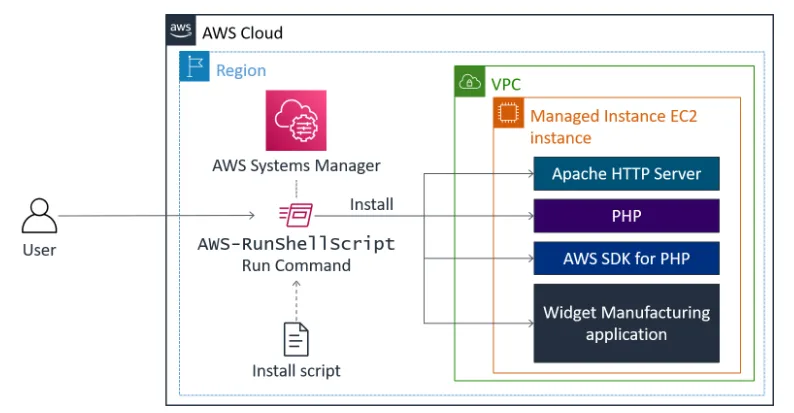
The preceding diagram, Systems Manager installs an application on an EC2 instance within a virtual private cloud (VPC). It is installed by using Run Command. Run Command will run the “install script” and install the following: Apache web server, PHP, AWS SDK, and the web application. Once everything is installed, it also starts the web server. The deployment process involves:
- Accessing the Run Command interface under Node Management in Systems Manager.
- Selecting a predefined installation script stored in a Systems Manager document.
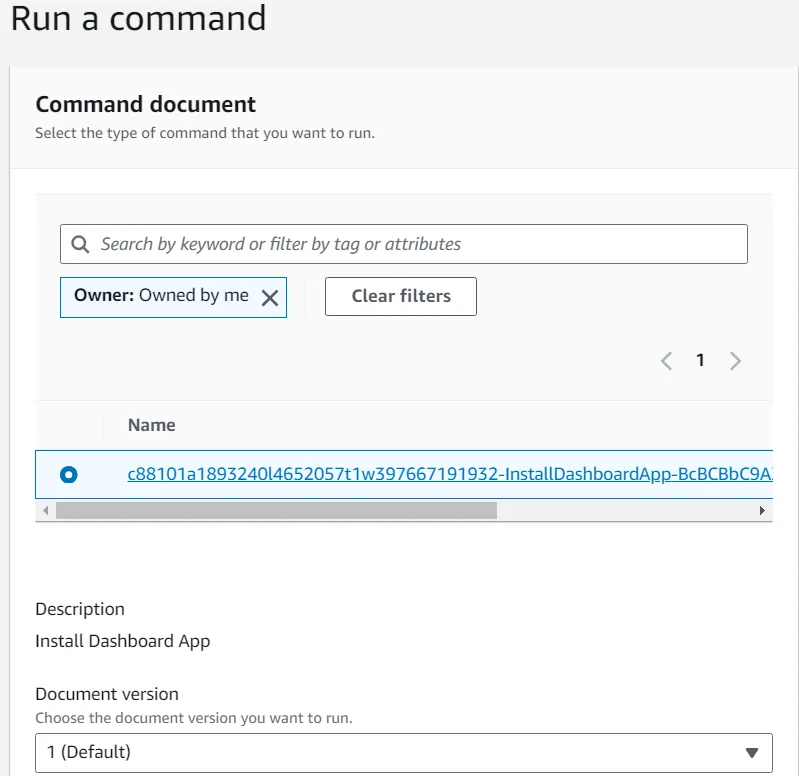
- Choose the search icon in the box, and a dropdown box appears. Choose the following options:
- OwnerOwned by me
- If the document is not already selected, select the button for the document.
- The following information appears for this document:
- Description Install Dashboard AppDocument version: 1 (Default)
- For Target selection, select Choose instances manually.
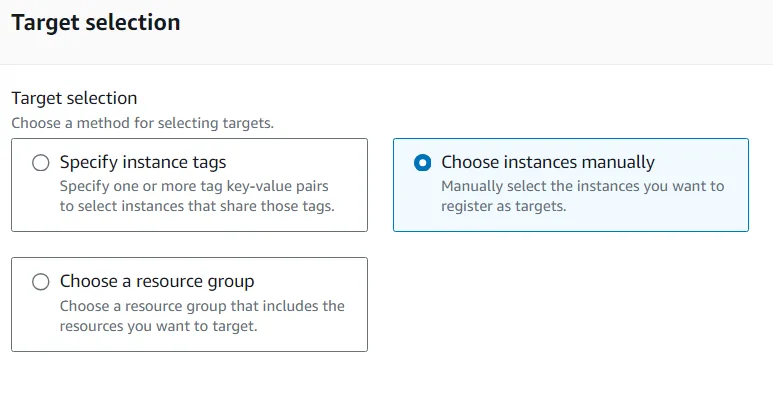
- In the Instances section, select Managed Instance. The Managed Instance has the Systems Manager agent installed. The agent has registered the instance to the service, which allows it to be selected for Run Command.
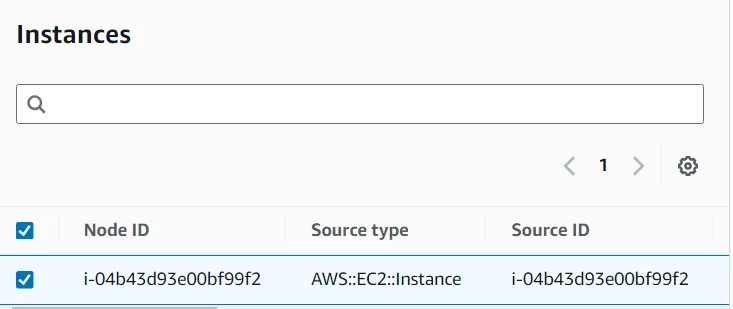
It is also possible to identify target instances by using tags. By using tags, you can run a single command on a whole fleet of matching instances.
- In the Output options section, clear Enable an S3 bucket.
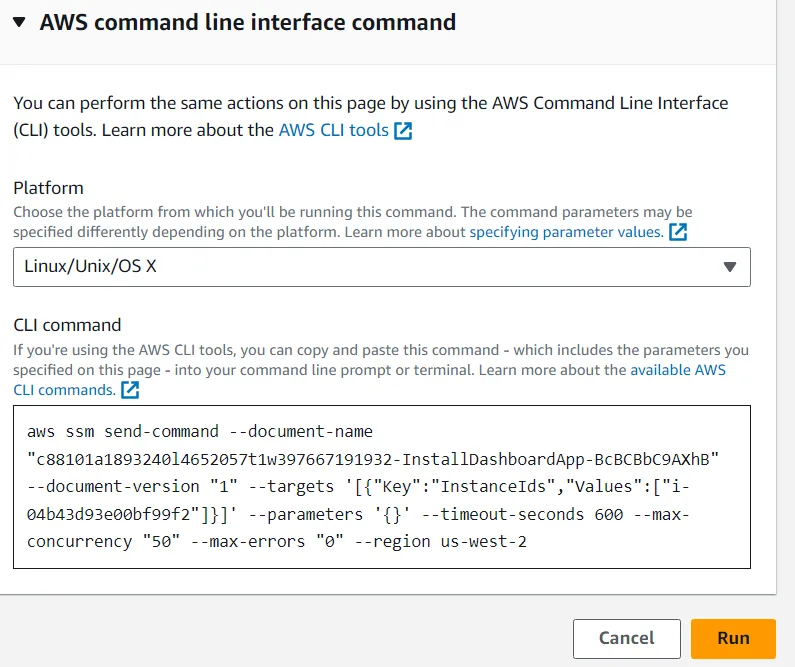
- Expand the AWS command line interface command section. This section displays the command line interface (CLI) command that initiates Run Command. You can copy this command and use it in the future within a script rather than having to use the AWS Management Console.
- Choose Run A banner with the Command ID indicates that it was successfully sent on the Command ID page.
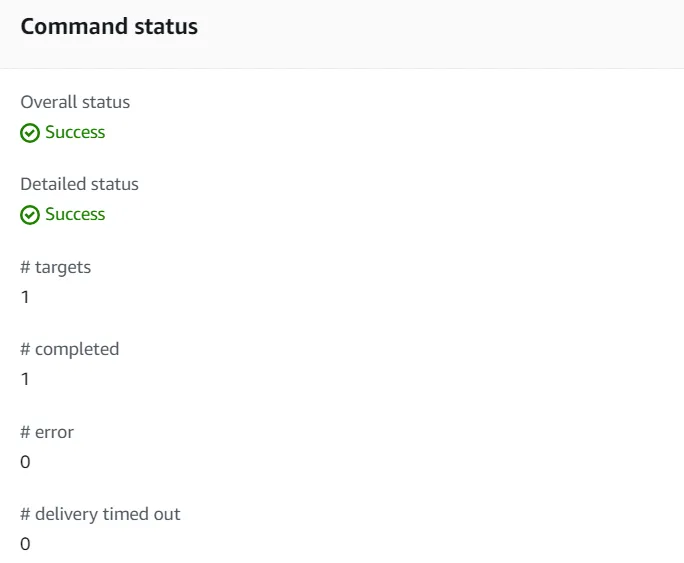
- After 1–2 minutes, the Overall status should change to Success. If it doesn’t, choose the refresh icon to update the status. You now validate the custom application that was installed.
- In the Vocareum console, choose the following options:
- Choose the Details dropdown list at the top of these instructions.
- Choose Show
- Copy the ServerIP value. (This value is the public IP address.)
- Open a new web browser tab, paste the IP address that you copied, and press Enter. The Widget Manufacturing Dashboard that you installed appears.
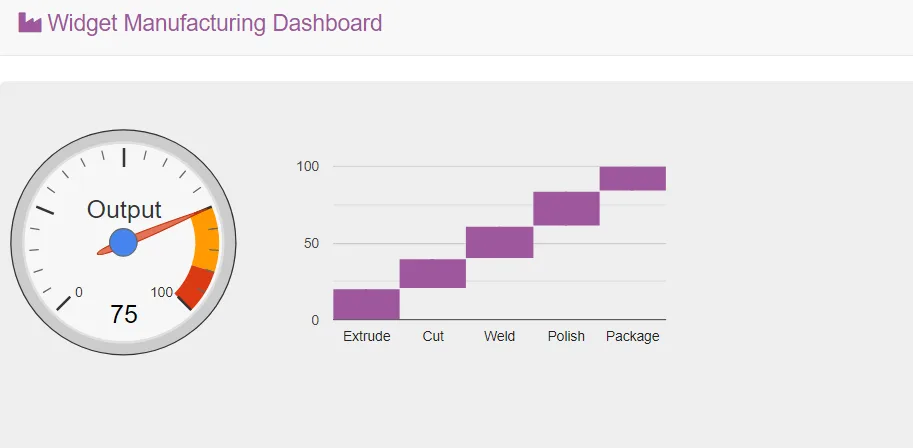
Once the installation completes successfully, the application is accessible via a web browser by entering the public IP address of the EC2 instance. This method of deployment enhances security by eliminating the need for direct access to the server while ensuring consistency in application rollouts across multiple instances.
Task 3: Managing Configuration Settings with Parameter Store
Modern applications often require dynamic configuration management, which is where AWS Systems Manager Parameter Store comes into play. Parameter Store offers secure, hierarchical storage for configuration variables such as database credentials, API keys, and feature flags.
To demonstrate its functionality, we create a parameter named /dashboard/show-beta-features with a value of True. This parameter determines whether experimental features should be displayed in the Widget Manufacturing Dashboard. The process involves:
- Navigating to the Parameter Store section under Application Management.
- Creating a new parameter with a descriptive name and appropriate value.
- Storing the parameter securely for use by applications.
In this task, you use Parameter Store to store a parameter that you use to activate a feature in an application.
- Keep the Widget Manufacturing Dashboard browser tab open, and return to the AWS Systems Manager tab.
- In the left navigation pane, for Application Management, choose Parameter Store.
- Choose Create parameter
- Choose the following options:
- For Name:, enter
/dashboard/show-beta-features - For Description: , enter
Display beta features - For Tier:, leave the default option.
- For Type:, leave the default option.
- For Value:, enter
True
- For Name:, enter
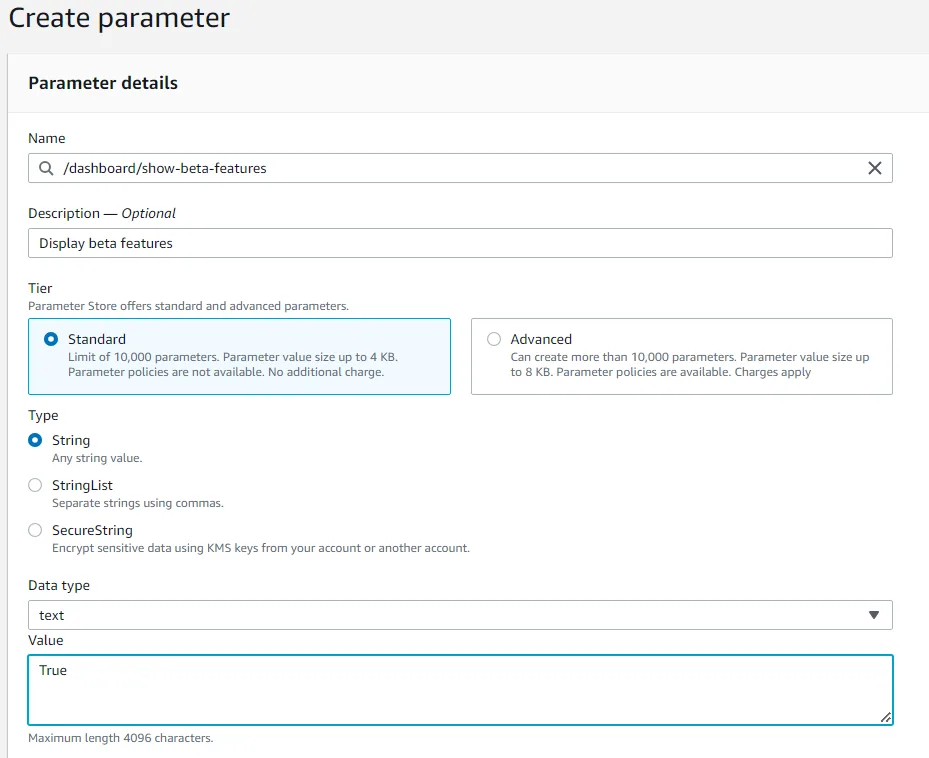
- Choose Create parameter A banner with the message “Create parameter request succeeded” appears at the top of the page. The parameter can be specified as a hierarchical path, such as /dashboard/<option>. The application that is running on Amazon EC2 automatically checks for this parameter. If it finds this existing parameter, then additional features are displayed.
- Return to the web browser tab that displays the application, and refresh the web page. If you accidentally closed this browser tab, choose the Details dropdown list at the top of these instructions, choose Show and then copy and paste the ServerIP value into a new browser tab.
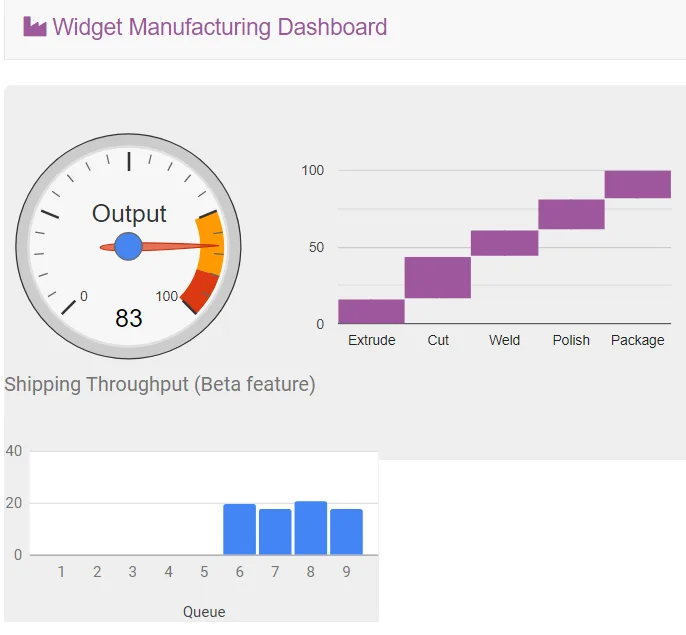
Notice that three charts are displayed. The application is now checking Parameter Store to determine whether the additional chart (which is still in beta) should be displayed. It is common to configure applications to display “dark features” that are installed but not yet activated.
Optional: Delete the parameter, and then refresh the browser tab with the application. The third chart disappears again.
Task 4: Secure Remote Access with Session Manager
Traditional SSH-based access to EC2 instances poses security risks, especially in environments requiring strict access control. AWS Systems Manager Session Manager provides a secure alternative by enabling browser-based shell access without exposing instances to the public internet.
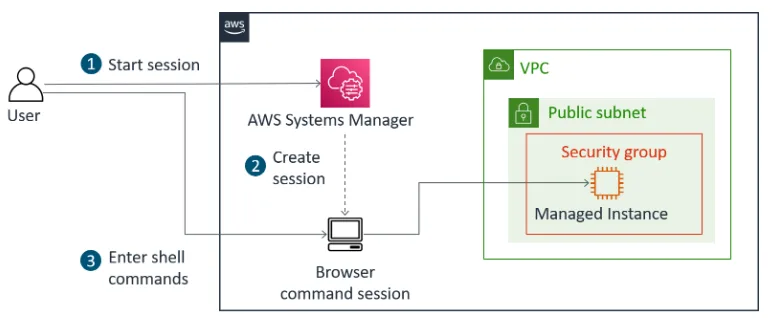
To initiate a session, follow these steps:
- In the left navigation pane, for Node Management, choose Session Manager.
- Choose Start session
- Select Managed Instance.
- Choose Start session A new session tab opens in your browser.

- To activate the cursor, choose anywhere in the session window.
- Run the following command in the session window:
ls /var/www/htmlThe output lists the application files that were installed on the instance.

Additionally, querying AWS metadata and instance details is possible using:
aws ec2 describe-instancesRun the following command in the session window:
# Get region
AZ=`curl -s http://169.254.169.254/latest/meta-data/placement/availability-zone` export AWS_DEFAULT_REGION=${AZ::-1}

# List information about EC2 instances aws ec2 describe-instances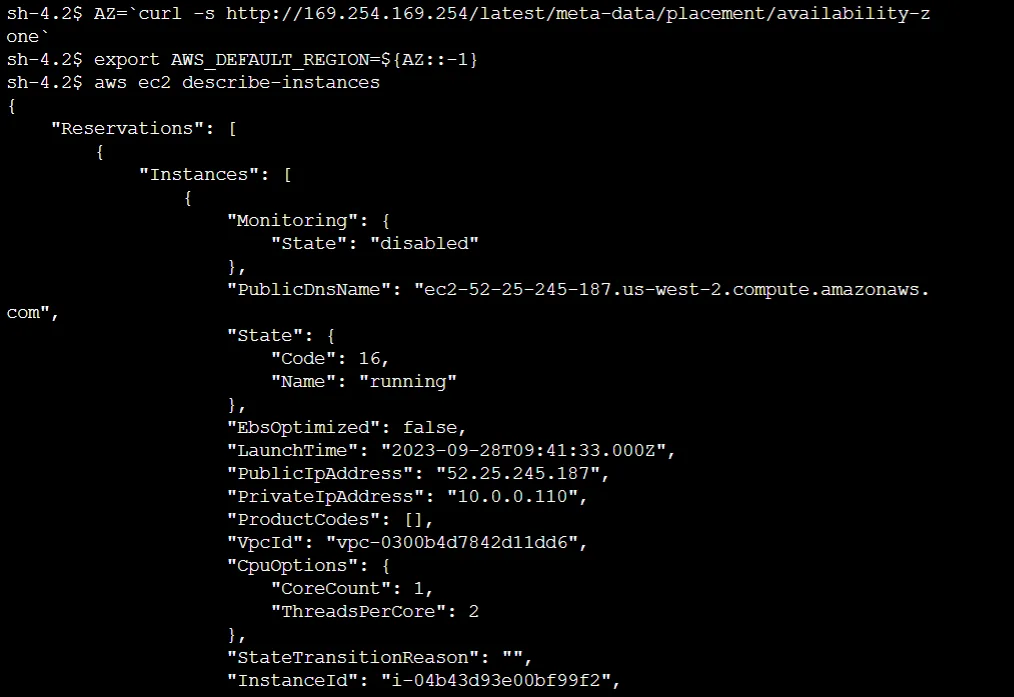
The output lists the EC2 instance details for the Managed Instance in JSON format.
{
    "Reservations": [
        {
            "Instances": [
                {
                    "Monitoring": {
                        "State": "disabled"
                    },
                    "PublicDnsName": "ec2-52-25-245-187.us-west-2.compute.amazonaws.com",
                    "State": {
                        "Code": 16,
                        "Name": "running"
                    },
                    "EbsOptimized": false,
                    "LaunchTime": "2023-09-28T09:41:33.000Z",
                    "PublicIpAddress": "52.25.245.187",
                    "PrivateIpAddress": "10.0.0.110",
                    "ProductCodes": [],
                    "VpcId": "vpc-0300b4d7842d11dd6",
                    "CpuOptions": {
                        "CoreCount": 1,
                        "ThreadsPerCore": 2
                    },
                    "StateTransitionReason": "",
                    "InstanceId": "i-04b43d93e00bf99f2",
                    "EnaSupport": true,
                    "ImageId": "ami-00755a52896316cee",
                    "PrivateDnsName": "ip-10-0-0-110.us-west-2.compute.internal",
                    "KeyName": "vockey",
                    "SecurityGroups": [
                        {
                            "GroupName": "AppSecurityGroup",
                            "GroupId": "sg-074d31431647dd09c"
                        }
                    ],
                    "ClientToken": "c8810-SSMIn-4VLFTX074K8Y",
                    "SubnetId": "subnet-0ff79a2329cf6c893",
                    "InstanceType": "t3.micro",
                    "CapacityReservationSpecification": {
                        "CapacityReservationPreference": "open"
                    },
                    "NetworkInterfaces": [
                        {
                            "Status": "in-use",
                            "MacAddress": "02:af:40:18:d8:75",
                            "SourceDestCheck": true,
                            "VpcId": "vpc-0300b4d7842d11dd6",
                            "Description": "",
                            "NetworkInterfaceId": "eni-0b90728f2d248d11a",
                            "PrivateIpAddresses": [
                                {
                                    "PrivateDnsName": "ip-10-0-0-110.us-west-2.compute.internal",
                                    "PrivateIpAddress": "10.0.0.110",
                                    "Primary": true,
                                    "Association": {
                                        "PublicIp": "52.25.245.187",
                                        "PublicDnsName": "ec2-52-25-245-187.us-west-2.compute.amazonaws.com",
                                        "IpOwnerId": "amazon"
                                    }
                                }
                            ],
                            "PrivateDnsName": "ip-10-0-0-110.us-west-2.compute.internal",
                            "InterfaceType": "interface",
                            "Attachment": {
                                "Status": "attached",
                                "DeviceIndex": 0,
                                "DeleteOnTermination": true,
                                "AttachmentId": "eni-attach-086ab34cf03375460",
                                "AttachTime": "2023-09-28T09:41:33.000Z"
                            },
                            "Groups": [
                                {
                                    "GroupName": "AppSecurityGroup",
                                    "GroupId": "sg-074d31431647dd09c"
                                }
                            ],
                            "Ipv6Addresses": [],
                            "OwnerId": "397667191932",
                            "PrivateIpAddress": "10.0.0.110",
                            "SubnetId": "subnet-0ff79a2329cf6c893",
                            "Association": {
                                "PublicIp": "52.25.245.187",
                                "PublicDnsName": "ec2-52-25-245-187.us-west-2.compute.amazonaws.com",
                                "IpOwnerId": "amazon"
                            }
                        }
                    ],
                    "SourceDestCheck": true,
                    "Placement": {
                        "Tenancy": "default",
                        "GroupName": "",
                        "AvailabilityZone": "us-west-2a"
                    },
                    "Hypervisor": "xen",
                    "BlockDeviceMappings": [
                        {
                            "DeviceName": "/dev/xvda",
                            "Ebs": {
                                "Status": "attached",
                                "DeleteOnTermination": true,
                                "VolumeId": "vol-0cbffec2c73e2f4cf",
                                "AttachTime": "2023-09-28T09:41:33.000Z"
                            }
                        }
                    ],
                    "Architecture": "x86_64",
                    "RootDeviceType": "ebs",
                    "IamInstanceProfile": {
                        "Id": "AIPAVZFWPZR6BJWFYUTPP",
                        "Arn": "arn:aws:iam::397667191932:instance-profile/App-Role"
                    },
                    "RootDeviceName": "/dev/xvda",
                    "VirtualizationType": "hvm",
                    "Tags": [
                        {
                            "Value": "c88101a1893240l4652057t1w397667191932",
                            "Key": "cloudlab"
                        },
                        {
                            "Value": "SSMInstance",
                            "Key": "aws:cloudformation:logical-id"
                        },
                        {
                            "Value": "arn:aws:cloudformation:us-west-2:397667191932:stack/c88101a1893240l4652057t1w397667191932/d96570c0-5de2-11ee-a3d5-02bf0f126d11",
                            "Key": "aws:cloudformation:stack-id"
                        },
                        {
                            "Value": "Managed Instance",
                            "Key": "Name"
                        },
                        {
                            "Value": "c88101a1893240l4652057t1w397667191932",
                            "Key": "aws:cloudformation:stack-name"
                        }
                    ],
                    "HibernationOptions": {
                        "Configured": false
                    },
                    "MetadataOptions": {
                        "State": "applied",
                        "HttpEndpoint": "enabled",
                        "HttpTokens": "optional",
                        "HttpPutResponseHopLimit": 1
                    },
                    "AmiLaunchIndex": 0
                }
            ],
            "ReservationId": "r-0959d0ac93d5e24b3",
            "RequesterId": "658754138699",
            "Groups": [],
            "OwnerId": "397667191932"
        }
    ]

}
By utilizing Session Manager, administrators can perform maintenance tasks while maintaining full auditability through AWS CloudTrail. This approach eliminates the need for SSH keys, reduces attack surface areas, and aligns with best security practices.
Conclusion
AWS Systems Manager is an essential tool for organizations seeking to optimize cloud operations. By leveraging its capabilities, administrators can automate inventory tracking, deploy applications efficiently, manage configurations securely, and access instances without compromising security.
Key takeaways from this guide include:
- Fleet Manager simplifies inventory management across hybrid environments.
- Run Command enables secure, script-based application deployment.
- Parameter Store ensures dynamic configuration management without hardcoding values.
- Session Manager provides secure, auditable instance access without SSH.
By integrating these capabilities into daily operations, IT teams can achieve greater efficiency, security, and compliance in managing AWS infrastructure. Whether you’re a cloud engineer, system administrator, or DevOps professional, mastering AWS Systems Manager will significantly enhance your ability to maintain robust and resilient cloud environments.
For additional resources, explore the official AWS documentation:
Unlock the full potential of AWS Systems Manager and elevate your cloud management strategy today.
How does AWS Systems Manager improve operational efficiency in cloud environments?
AWS Systems Manager centralizes resource management by providing automated inventory tracking, application deployment, configuration storage, and secure remote access. It eliminates the need for manual SSH access, reducing administrative overhead and enhancing security. By automating repetitive tasks, Systems Manager enables cloud engineers to focus on optimizing infrastructure performance and reliability.
What are the security advantages of using AWS Systems Manager over traditional SSH access?
AWS Systems Manager enhances security by eliminating the need for open inbound SSH ports. Session Manager provides secure, browser-based access to instances with full auditability via AWS CloudTrail. Additionally, it integrates with IAM roles to enforce least privilege access, reducing the risk of unauthorized connections and credential leaks.
How does AWS Systems Manager integrate with automation and compliance monitoring?
AWS Systems Manager supports automation through Run Command and State Manager, enabling administrators to apply consistent configurations across instances. It also helps enforce compliance by continuously collecting inventory data with Fleet Manager, ensuring that resources adhere to organizational policies. Integration with AWS Config and AWS Security Hub further strengthens compliance monitoring.
Can AWS Systems Manager be used for hybrid cloud management, and how?
Yes, AWS Systems Manager supports hybrid environments by managing both AWS and on-premises instances. By installing the Systems Manager Agent (SSM Agent) on on-premises servers and registering them as managed instances, users can apply the same operational tasks, such as patch management, inventory collection, and secure access, across both cloud and on-premises infrastructure.
How does AWS Systems Manager Parameter Store enhance application management?
Parameter Store provides a secure, hierarchical storage system for application configurations, secrets, and environment variables. It allows applications to dynamically retrieve settings without hardcoding sensitive information. Integration with AWS Key Management Service (KMS) enables encryption, ensuring secure storage of credentials and API keys. This feature is essential for implementing scalable and secure DevOps practices.
