In the rapidly evolving landscape of cloud computing, network configuration stands as a fundamental pillar for ensuring seamless communication between resources. Amazon Web Services (AWS) offers a robust environment for managing network infrastructure, with Dynamic Host Configuration Protocol version 4 (DHCPv4) playing a critical role in automating IP address management. This article provides a detailed exploration of configuring and testing DHCPv4 within an AWS Virtual Private Cloud (VPC), offering network administrators and cloud practitioners a valuable reference for implementing efficient IP address management.
The primary objective of this project is to establish a fully functional DHCPv4 environment within AWS, allowing EC2 instances to automatically receive IP address configurations without manual intervention. By implementing this solution, organizations can significantly reduce the administrative overhead associated with managing IP addresses while ensuring consistent network configurations across their cloud infrastructure. The process encompasses various AWS networking components, including VPCs, subnets, DHCP option sets, internet gateways, and route tables, all working in concert to create a cohesive networking environment.
Let’s Get Started
Understanding DHCPv4 in Cloud Environments
Before delving into the configuration process, it’s essential to understand what DHCPv4 is and why it matters in cloud environments like AWS. DHCPv4 (Dynamic Host Configuration Protocol version 4) is a network management protocol that automatically assigns IP addresses and other network configuration parameters to devices on a network. In traditional on-premises environments, DHCP servers handle this task, but in AWS, this functionality is built into the platform through DHCP option sets.
The significance of DHCPv4 in AWS cannot be overstated. As organizations scale their cloud infrastructure, manually assigning and tracking IP addresses becomes increasingly complex and error-prone. DHCPv4 eliminates this challenge by automating the process, ensuring that each EC2 instance receives appropriate network configurations automatically. This automation not only saves time but also reduces the risk of IP address conflicts and misconfiguration issues that can lead to network connectivity problems.
In AWS, DHCPv4 works slightly differently than in traditional networks. Rather than running a separate DHCP server, AWS implements DHCP functionality as part of its networking infrastructure through DHCP option sets. These option sets can be attached to VPCs, ensuring that all resources within that VPC receive consistent network configurations. This approach aligns perfectly with AWS’s philosophy of providing managed services that reduce operational overhead while maintaining full functionality.
Core Components of AWS Networking
Virtual Private Cloud (VPC)
At the heart of AWS networking lies the Virtual Private Cloud (VPC), a logically isolated section of the AWS cloud where you can launch resources in a defined virtual network. Think of a VPC as your private data center within AWS, providing complete control over your networking environment. A VPC spans all the Availability Zones in a region, allowing you to distribute your resources for high availability and fault tolerance.
The VPC is defined by its IP address range, specified using Classless Inter-Domain Routing (CIDR) notation (e.g., 192.168.10.0/24). This CIDR block determines the total number of IP addresses available within your VPC. When designing a VPC, it’s crucial to select an appropriate CIDR block that provides enough addresses for current needs while allowing for future growth. The VPC serves as the foundation for all other networking components, including subnets, route tables, and network access control lists.
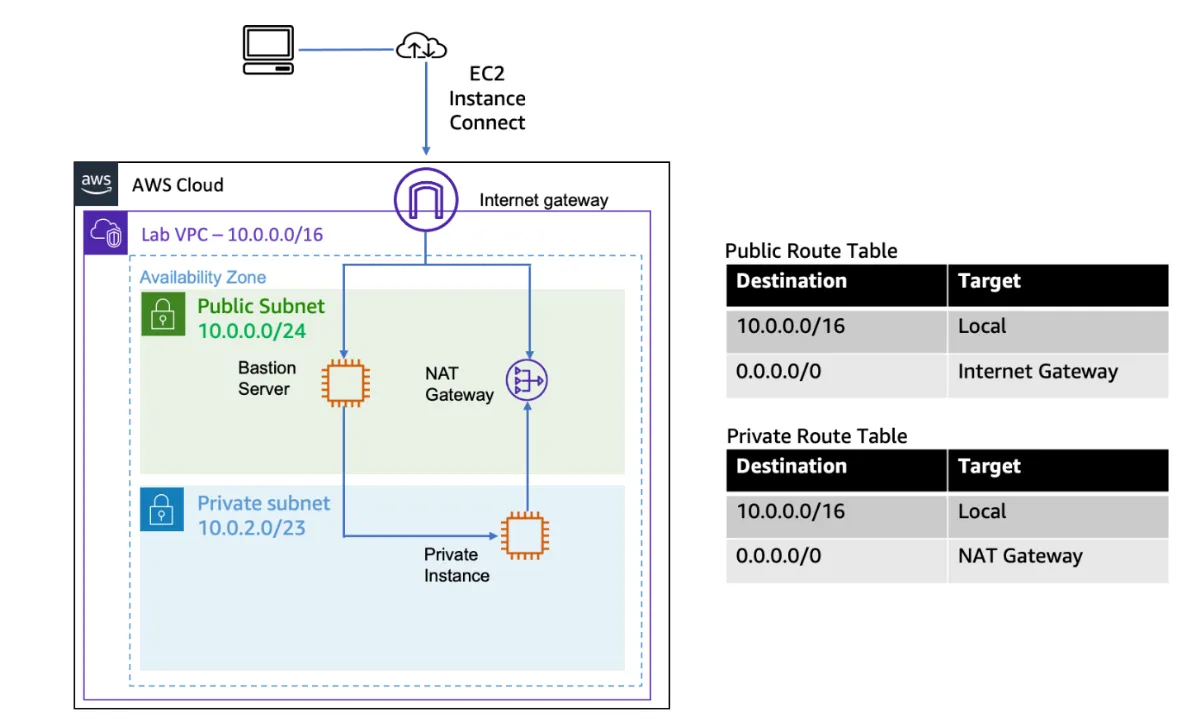
VPCs provide several key benefits for network administrators. They offer isolation from other customers on the AWS cloud, ensuring that your resources operate in a secure, private environment. They also provide flexibility in network design, allowing you to create complex architectures that mirror on-premises networks. Additionally, VPCs support connectivity to on-premises networks through VPN connections or Direct Connect, facilitating hybrid cloud deployments.
Subnets
Subnets are subdivisions of a VPC’s IP address range, allowing you to segment your network for better organization and security. Each subnet resides in a specific Availability Zone and cannot span multiple zones. This design ensures that resources within a subnet are physically located in the same data center, minimizing network latency. However, a VPC can have multiple subnets spread across different Availability Zones to achieve high availability.
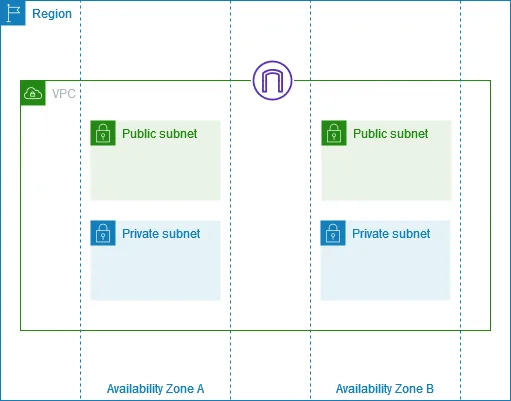
In our DHCPv4 configuration project, we utilize two types of subnets:
Public Subnets: These subnets have a route to the internet via an Internet Gateway and are suitable for resources that need to be accessible from the internet, such as web servers or bastion hosts. Instances in public subnets typically have public IP addresses in addition to their private IP addresses.
Private Subnets: These subnets do not have a direct route to the internet and are appropriate for resources that should not be directly accessible from the internet, such as database servers or application servers. Instances in private subnets can still access the internet through a NAT Gateway or NAT Instance if required, but they cannot receive unsolicited inbound connections from the internet.
The separation between public and private subnets is a fundamental security principle in cloud architecture, implementing the concept of defense in depth. By placing sensitive resources in private subnets, you reduce the attack surface and minimize the risk of unauthorized access. Each subnet, whether public or private, is associated with a specific CIDR block that must be a subset of the VPC’s CIDR block.
DHCP Options Set
The DHCP Options Set is a configuration component in AWS that allows you to control the network settings provided to instances when they boot up. When an EC2 instance starts, it contacts the DHCP server to obtain network configuration information. The DHCP Options Set determines what information is provided in response to this request.
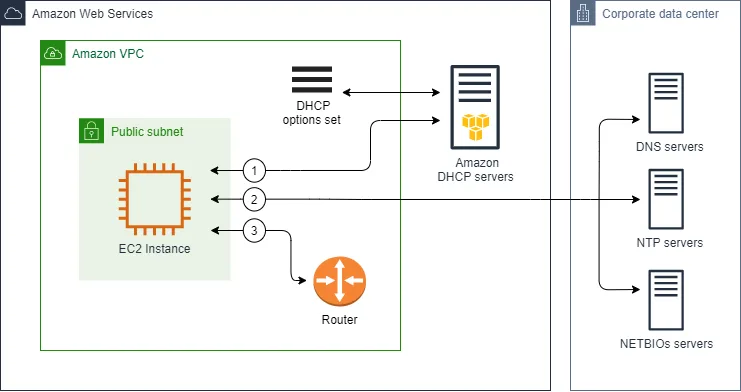
Key parameters that can be configured in a DHCP Options Set include:
Domain Name Servers: These are the DNS servers that instances will use to resolve domain names. You can specify Amazon’s DNS servers (AmazonProvidedDNS) or your own custom DNS servers.
Domain Name: This is the domain name that will be appended to hostnames. For example, if you specify “example.com” as the domain name, an instance with a hostname of “webserver” would have a fully qualified domain name of “webserver.example.com”.
NTP Servers: These are the Network Time Protocol servers that instances will use to synchronize their clocks.
NetBIOS Name Servers and Node Type: These settings are relevant for Windows instances and determine how NetBIOS name resolution is handled.
Once created, a DHCP Options Set must be associated with a VPC to take effect. It’s worth noting that only one DHCP Options Set can be associated with a VPC at any given time, and a DHCP Options Set can be associated with multiple VPCs. This design allows for consistent network configurations across multiple VPCs if desired.
Internet Gateway
An Internet Gateway is a horizontally scaled, redundant, and highly available VPC component that allows communication between instances in your VPC and the internet. It provides a target in your VPC route tables for internet-routable traffic and performs network address translation (NAT) for instances that have been assigned public IP addresses.
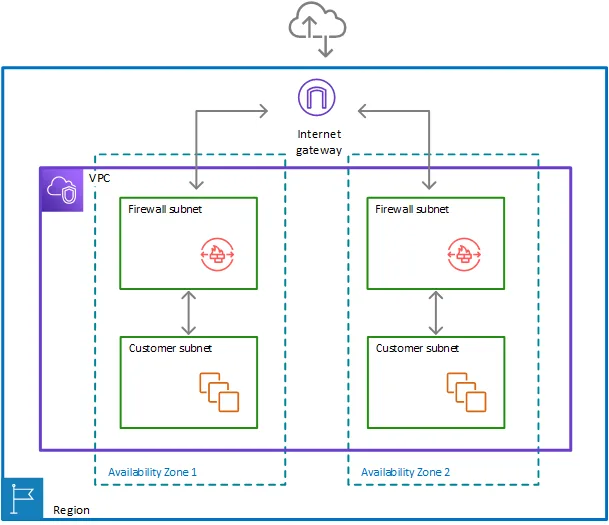
In essence, an Internet Gateway serves as the bridge between your VPC and the broader internet. Without an Internet Gateway, resources within your VPC would be isolated from the internet, regardless of whether they have public IP addresses. This is a fundamental security feature of AWS VPCs: by default, all resources are isolated from the internet until you explicitly configure connectivity.
For our DHCPv4 configuration project, an Internet Gateway is essential to allow instances in the public subnet to communicate with the internet. This connectivity enables these instances to download updates, access external services, or serve content to users on the internet. The Internet Gateway is attached to the VPC and then referenced in route tables to enable internet access.
Route Table
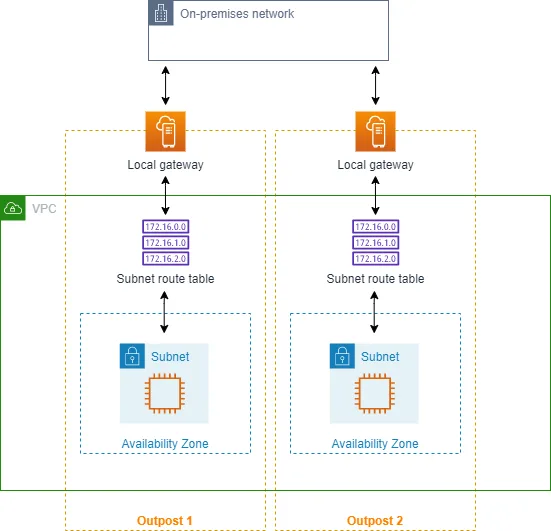
Route Tables are a critical component of VPC networking, controlling the flow of traffic within your VPC and to external networks. Each subnet in your VPC must be associated with a route table, which contains a set of rules (routes) that determine where network traffic is directed. A route in a route table specifies a destination CIDR block and a target (where the traffic should be sent).
In a typical VPC setup, you would have at least two route tables:
Main Route Table: This is the default route table that is created with your VPC. By default, it contains only a local route, which allows communication between all resources within the VPC. Subnets that are not explicitly associated with any route table are implicitly associated with the main route table.
Custom Route Tables: These are additional route tables that you create to implement specific routing policies. For example, you might create a custom route table for public subnets that includes a route to the internet via an Internet Gateway.
For our DHCPv4 configuration project, proper configuration of route tables is essential to ensure that instances in the public subnet can access the internet, while instances in the private subnet remain isolated from direct internet access. This is achieved by adding a route to the internet (0.0.0.0/0) via the Internet Gateway in the route table associated with the public subnet, while omitting this route from the route table associated with the private subnet.
Step-by-Step Configuration of DHCPv4 in AWS
Creating a Virtual Private Cloud (VPC)
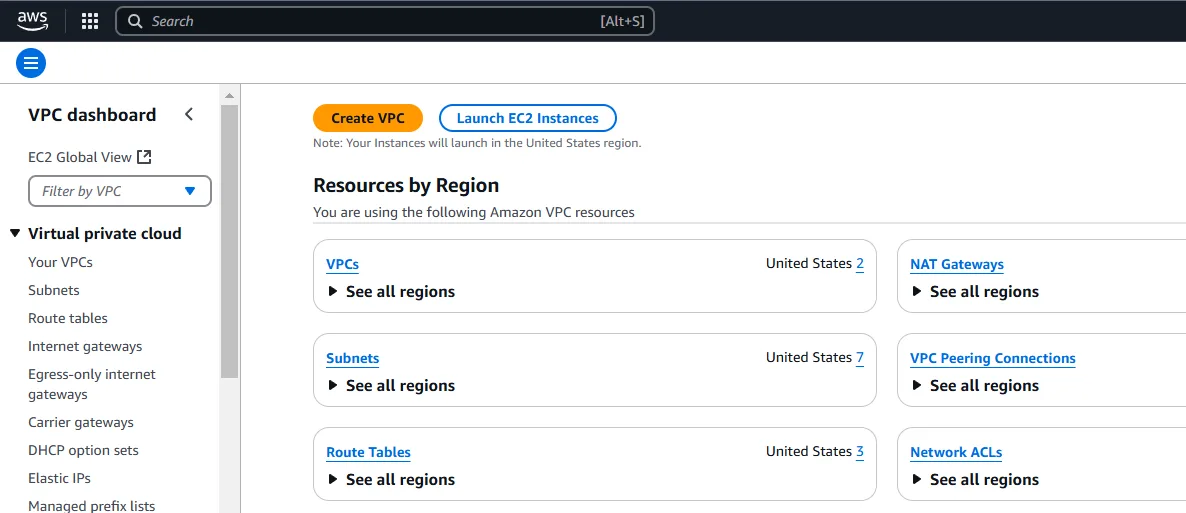
The first step in our DHCPv4 configuration project is to create a Virtual Private Cloud (VPC) that will serve as the foundation for our network infrastructure. This process begins by accessing the AWS Management Console and navigating to the VPC Dashboard. From there, we select “Create VPC” to begin the configuration process.
When creating a VPC, we need to specify a CIDR block that defines the IP address range for our VPC. For this project, we’ll use 192.168.10.0/24, which provides 256 IP addresses (though some are reserved by AWS for internal use). This CIDR block is suitable for a small to medium-sized deployment, providing enough addresses for our test environment while being manageable.
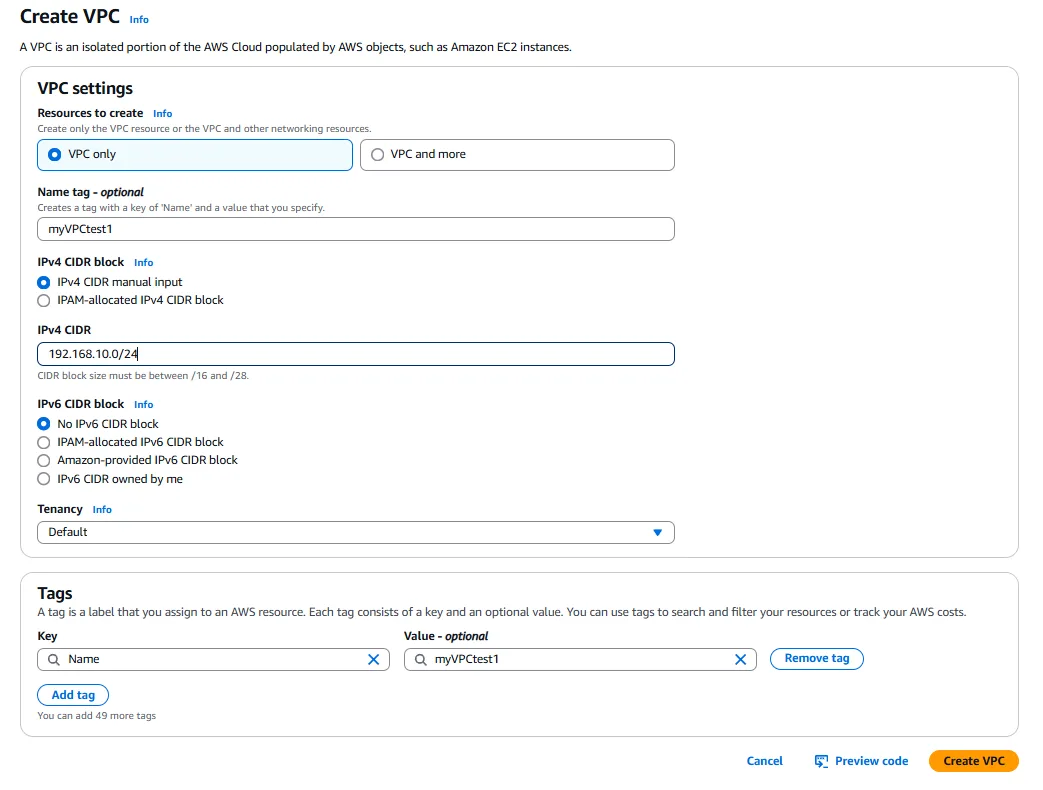
In addition to the CIDR block, we need to specify a name for our VPC to make it easily identifiable. A descriptive name like “myVPCtest1” helps in identifying the purpose of this VPC among others in the AWS account. We also need to decide whether to enable DNS hostnames and DNS resolution for the VPC. For our DHCPv4 testing, both of these options should be enabled to ensure that instances can resolve domain names correctly.
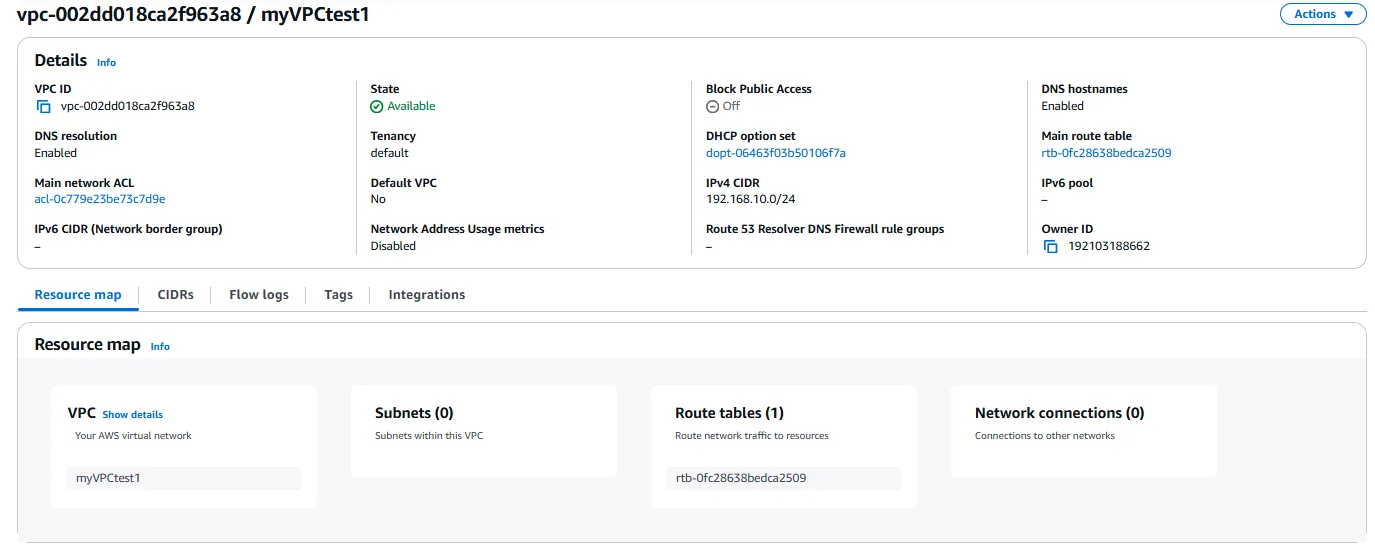
Once these settings are configured, we can create the VPC. After creation, AWS automatically creates a main route table, a network ACL, and a security group for the VPC. These default resources provide a starting point for our configuration, but we’ll need to customize them to meet our specific requirements as we progress through the project.
Configuring Subnets
With our VPC in place, the next step is to create subnets to segment our network. For this project, we’ll create two subnets: a public subnet for resources that need internet access and a private subnet for resources that should remain isolated from the internet. This segmentation is a best practice for security, ensuring that sensitive resources are not directly exposed to the internet.
To create a subnet, we navigate to the Subnets section of the VPC Dashboard and select “Create subnet.” For each subnet, we need to specify the following:

VPC: We select the VPC we created in the previous step (myVPCtest1).

Subnet Name: We provide a descriptive name like “Public-Subnet” or “Private-Subnet” to indicate the purpose of each subnet.
Availability Zone: We select an Availability Zone for the subnet. For high availability, it’s recommended to distribute subnets across different Availability Zones, but for our testing purposes, we can use a single zone.
IPv4 CIDR Block: We specify a CIDR block for each subnet, which must be a subset of the VPC’s CIDR block. For example, if our VPC CIDR is 192.168.10.0/24, we might use 192.168.10.0/25 for the public subnet (providing 128 addresses) and 192.168.10.128/25 for the private subnet (providing another 128 addresses).
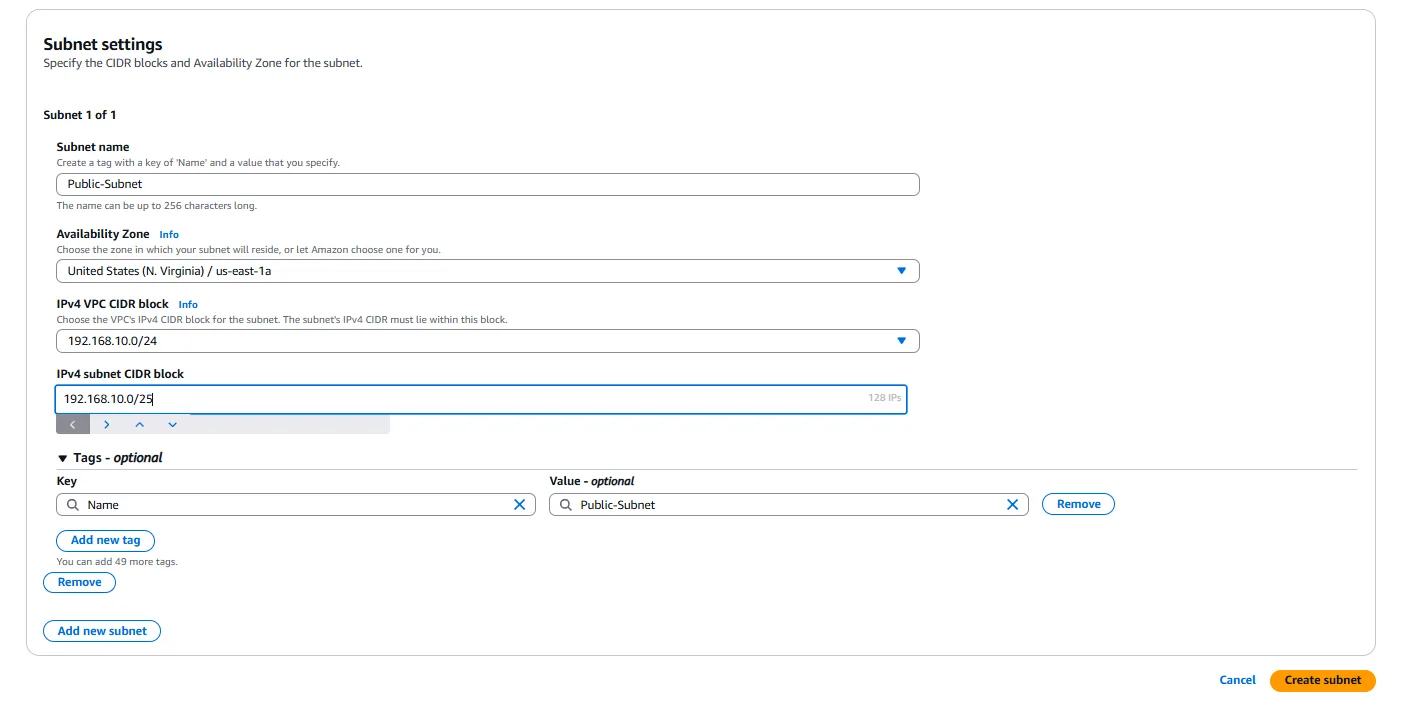
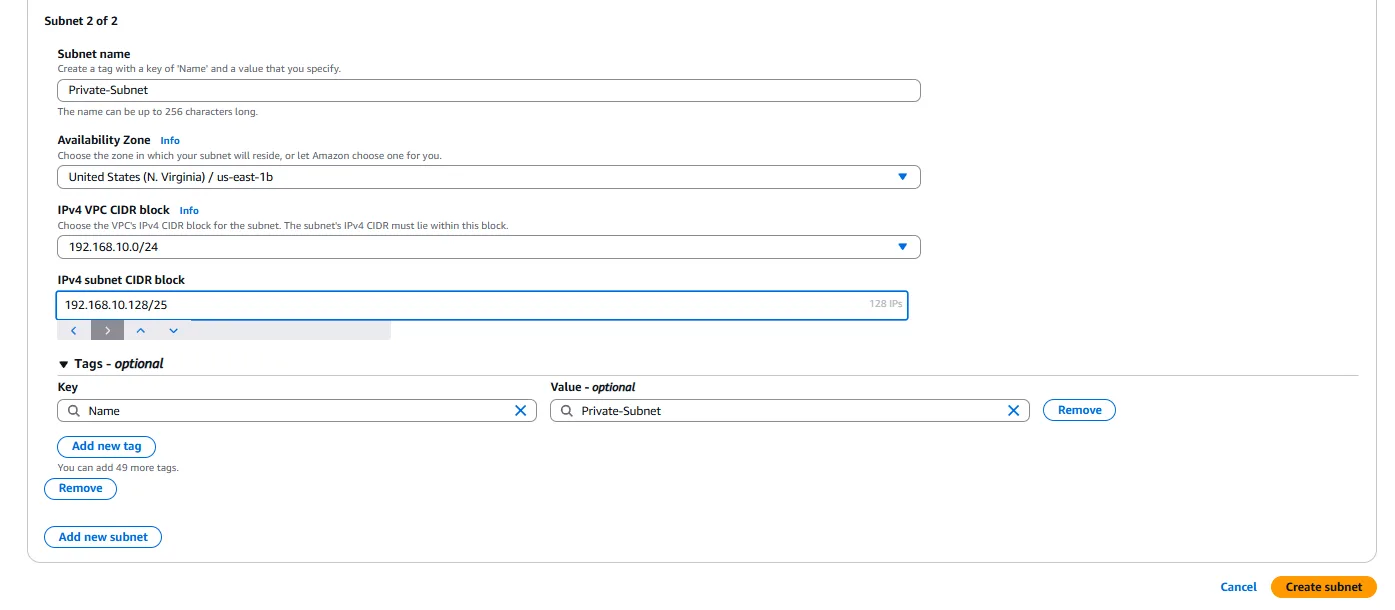
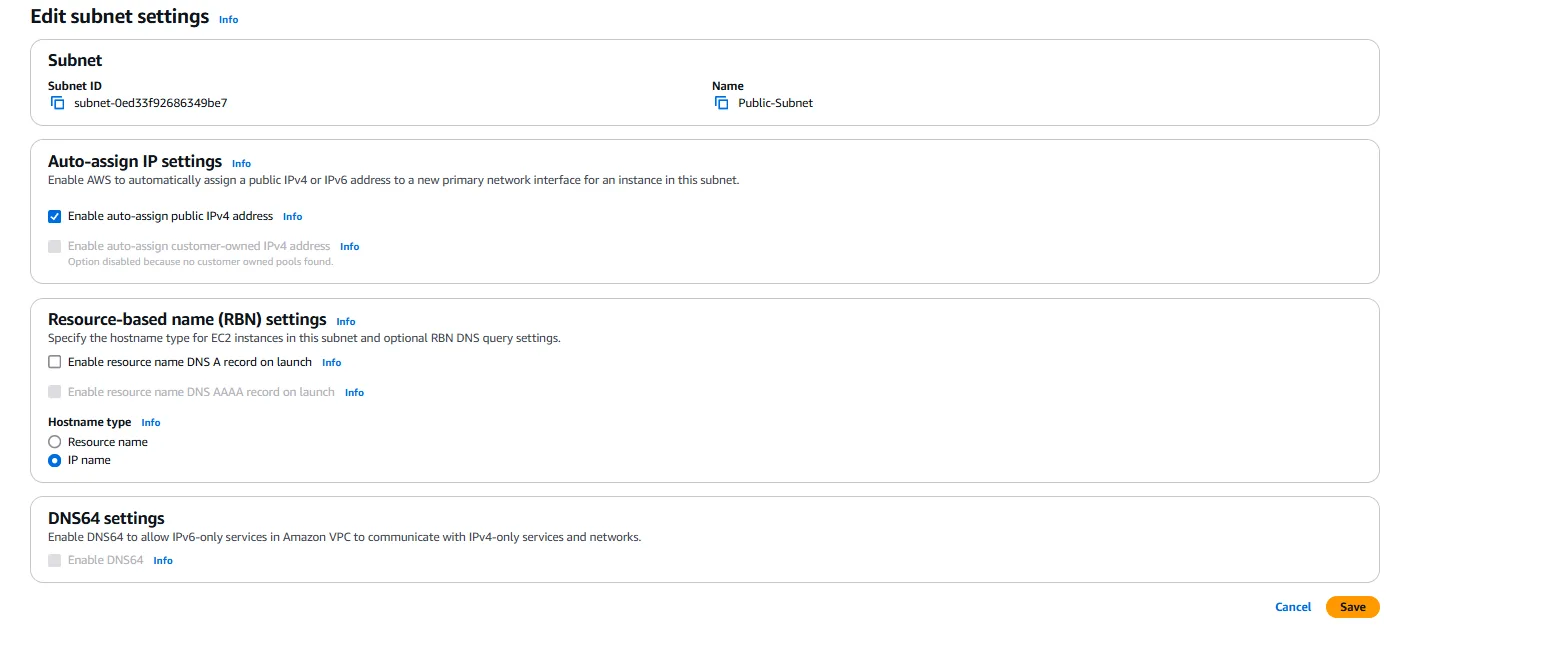
After creating both subnets, we need to configure the public subnet to auto-assign public IP addresses to instances launched within it. This is done by selecting the public subnet, clicking on “Actions,” and then “Modify auto-assign IP settings.” We enable the “Auto-assign IPv4” option to ensure that instances in this subnet automatically receive a public IP address in addition to their private IP address.

Setting Up DHCP Options Set
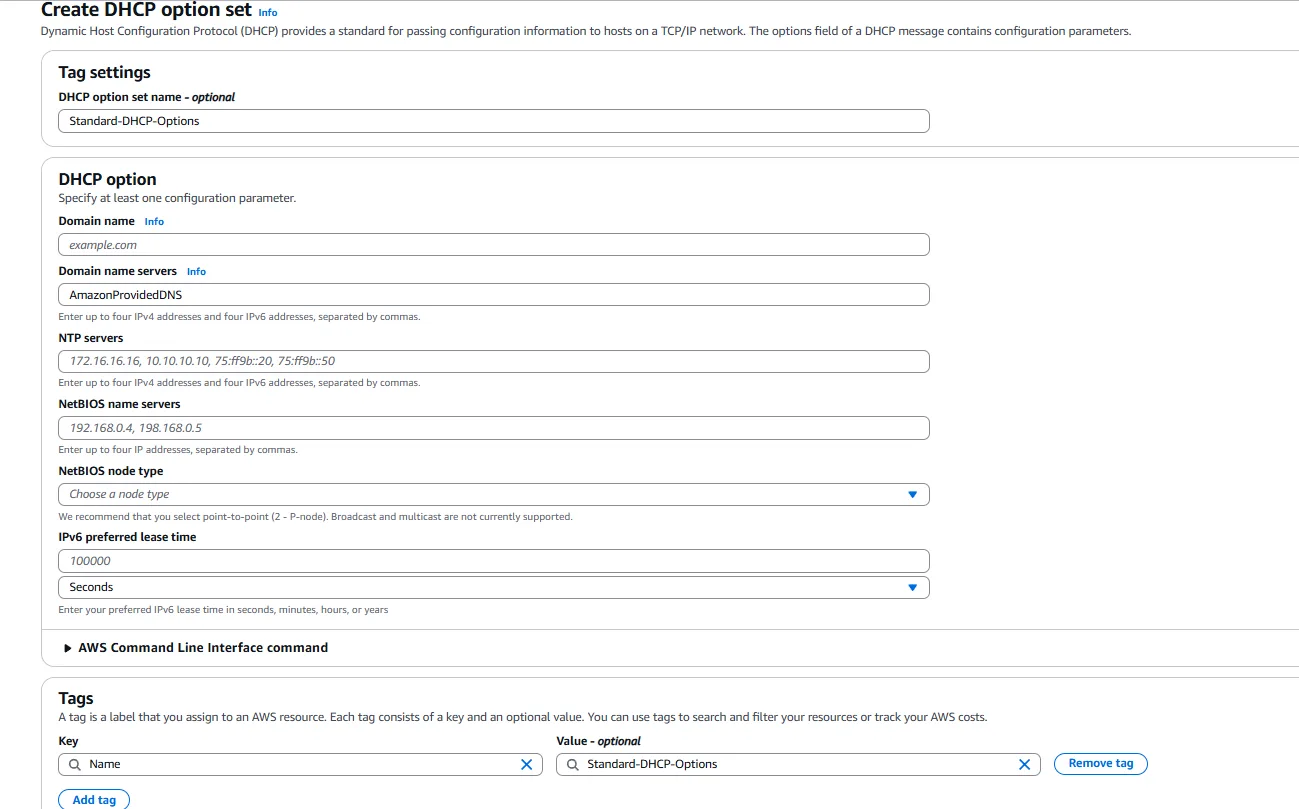
The core of our project involves configuring a DHCP Options Set to manage network settings for EC2 instances automatically. To create a DHCP Options Set, we navigate to the DHCP Options Sets section of the VPC Dashboard and select “Create DHCP options set.” We then provide the following information:
Name: We give our DHCP Options Set a descriptive name like “Standard-DHCP-Options” to indicate its purpose.
Domain Name Servers: We specify “AmazonProvidedDNS” to use AWS’s DNS servers, which are highly available and automatically resolve AWS-specific domain names. Alternatively, we could specify custom DNS servers if required by our network architecture.
Domain Name: We can either leave this blank to use the default domain name provided by AWS or specify a custom domain name if our organization uses a specific domain for internal resources.
NTP Servers: For time synchronization, we can specify NTP servers. This is optional but recommended for ensuring consistent time settings across all instances.
NetBIOS Name Servers and NetBIOS Node Type: These settings are primarily relevant for Windows instances. For a standard configuration, we canl eave these blank.
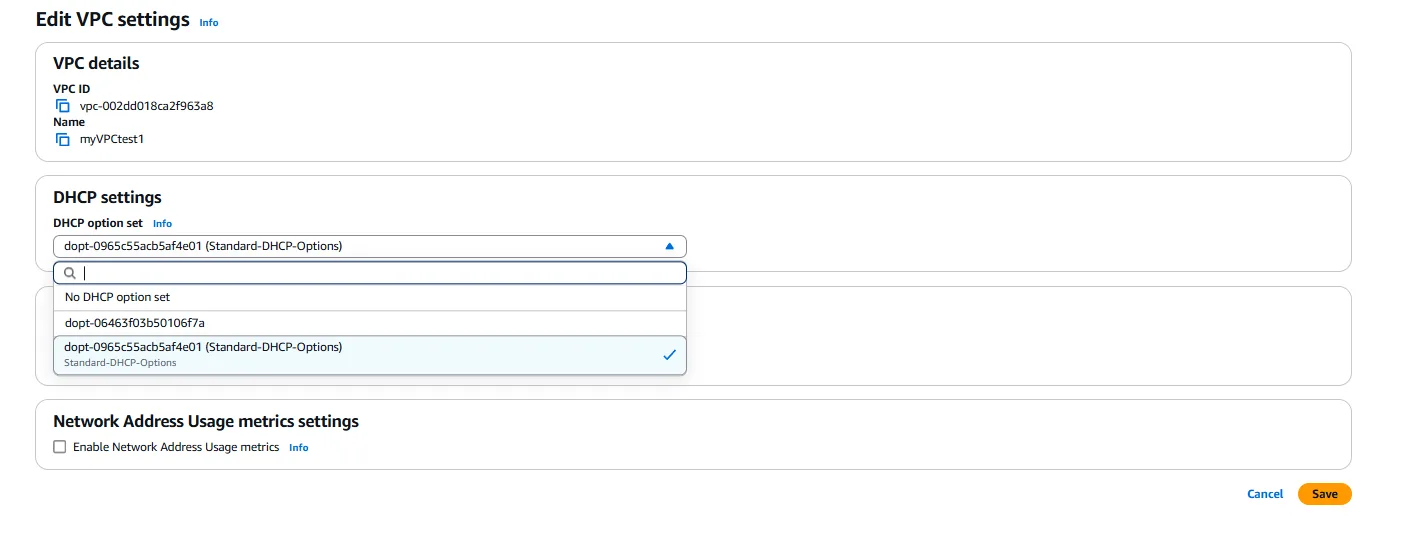
After creating the DHCP Options Set, we need to associate it with our VPC. This is done by selecting the VPC, clicking on “Actions,” and then “Edit DHCP options set.” We select our newly created DHCP Options Set from the dropdown menu and save the changes. Once associated, all instances launched in this VPC will receive network configuration from this DHCP Options Set.
It’s important to note that changes to DHCP Options Sets do not immediately affect running instances. The new settings take effect only when an instance renews its DHCP lease or when a new instance is launched. Therefore, it’s best to configure DHCP Options Sets before launching instances or to plan for instance restarts after making changes.
Configuring Internet Gateway
To provide internet access for instances in the public subnet, we need to set up an Internet Gateway. This process begins by navigating to the Internet Gateways section of the VPC Dashboard and selecting “Create internet gateway.” We provide a name for our gateway, such as “DHCP-Test-IGW,” and create it.

Once the Internet Gateway is created, it needs to be attached to our VPC. We select the newly created gateway, click on “Actions,” and then “Attach to VPC.” We select our myVPCtest1 from the dropdown menu and confirm the attachment. This establishes the connection between our VPC and the internet but does not yet enable instances to access the internet.


Setting Up Route Tables
To enable internet access for instances in the public subnet, we need to configure route tables appropriately. First, we navigate to the Route Tables section of the VPC Dashboard and identify the main route table associated with our VPC. By default, this route table contains only a local route (for traffic within the VPC).
For our public subnet, we create a new route table by clicking on “Create route table.” We provide a name like “Public-Route-Table” and associate it with our VPC.
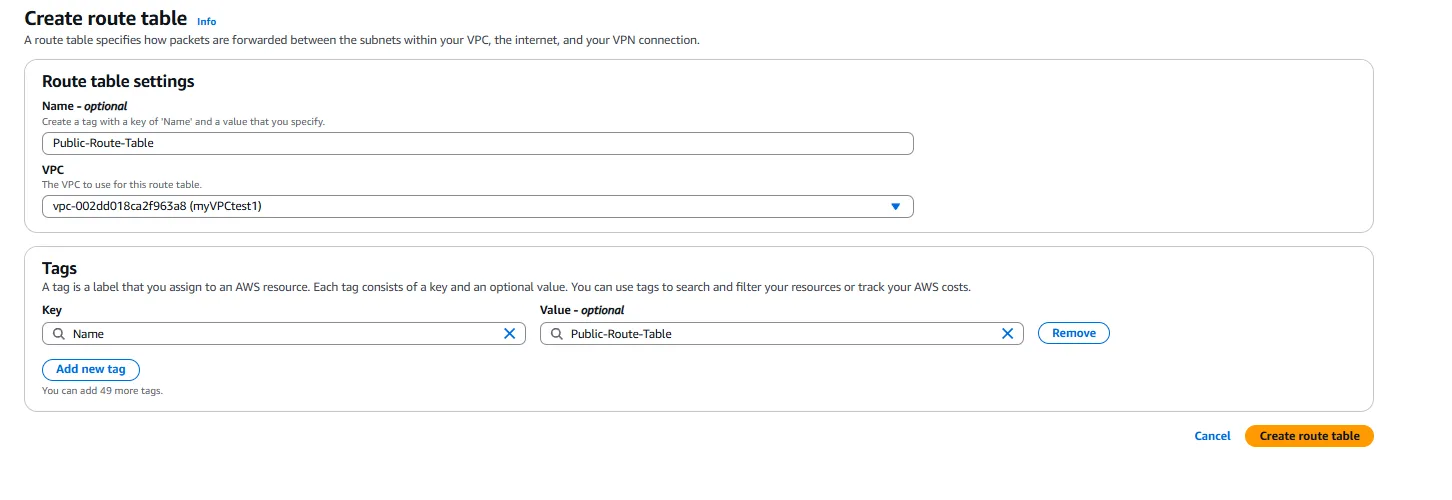
Once created, we add a route to direct internet-bound traffic to our Internet Gateway. This is done by selecting the route table, navigating to the “Routes” tab, and clicking on “Edit routes.” We add a new route with a destination of “0.0.0.0/0” (representing all IP addresses) and a target of our Internet Gateway. This route ensures that any traffic not destined for within the VPC is sent to the internet.


After configuring the routes, we need to associate our public subnet with this route table. We select the route table, navigate to the “Subnet Associations” tab, click on “Edit subnet associations,” select our public subnet, and save the association. This ensures that instances in the public subnet can communicate with the internet.


For our private subnet, we can use the main route table, which contains only the local route. This ensures that instances in the private subnet can communicate with other resources within the VPC but cannot directly access the internet. If internet access is required for instances in the private subnet (for example, for downloading updates), we would need to configure a NAT Gateway or NAT Instance, but that is beyond the scope of our current project.
Launching EC2 Instances
With our network infrastructure in place, we can now launch EC2 instances to test our DHCPv4 configuration. For comprehensive testing, we’ll launch a total of nine instances: three in the public subnet and six in the private subnet. This distribution allows us to verify DHCP functionality across different subnets and ensure that the network segmentation is working as expected.
To launch an EC2 instance, we navigate to the EC2 Dashboard and click on “Launch Instance.” We then proceed through the instance launch wizard, making the following selections:

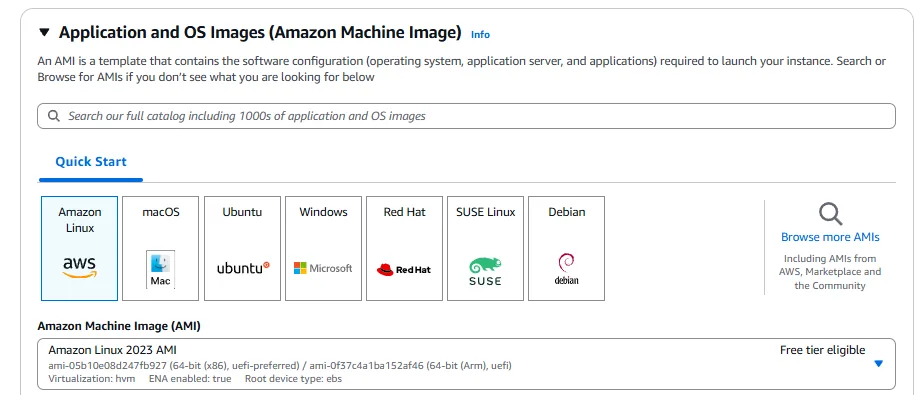
Amazon Machine Image (AMI): We select an appropriate AMI for our testing. For simplicity, we can use Amazon Linux 2, which is optimized for AWS and includes necessary tools for network testing.
Instance Type: We select an instance type based on our performance requirements. For testing purposes, t2.micro or t3.micro is usually sufficient and falls within the AWS Free Tier.

Configure Instance Details: This is where we specify the network settings for our instance. We select our VPC (myVPCtest1) and the appropriate subnet (either Public-Subnet or Private-Subnet). We also ensure that “Auto-assign Public IP” is enabled for instances in the public subnet and disabled for instances in the private subnet.

Add Storage: We can use the default storage settings for our testing purposes.
Add Tags: We add a Name tag to each instance to identify its purpose and location. For example, “Public-Instance-1” or “Private-Instance-1.”
Configure Security Group: We create or select a security group that allows SSH access (port 22) for Linux instances or RDP access (port 3389) for Windows instances. For instances in the public subnet, we allow access from our IP address for security. For instances in the private subnet, we allow access only from within the VPC.
After configuring these settings, we launch the instances and wait for them to initialize. This process typically takes a few minutes, during which the instances obtain their IP configurations via DHCP.

Verifying DHCP Functionality
Once our instances are running, we can connect to them to verify that DHCP is functioning correctly. For instances in the public subnet, we can connect directly using SSH (for Linux) or RDP (for Windows) from our local machine. For instances in the private subnet, we would need to first connect to an instance in the public subnet (acting as a bastion host) and then connect to the private instances from there.
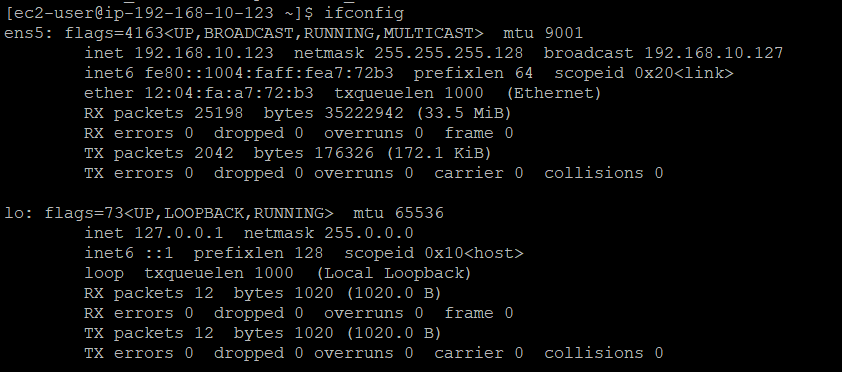
After connecting to an instance, we can verify its IP configuration using the appropriate command:
For Linux instances, we use the command
ip a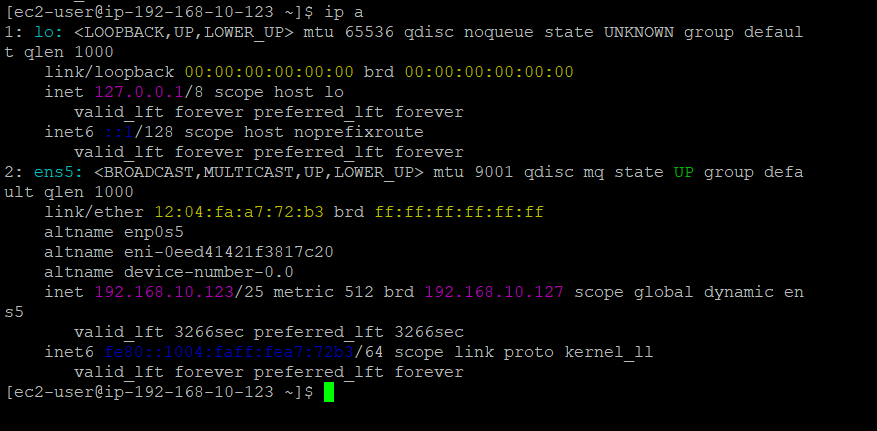
or
ifconfigto display the network interfaces and their IP addresses.
For Windows instances, we use the command
ipconfig /allto display detailed IP configuration information.
In the output of these commands, we should see that each instance has received a private IP address from within the CIDR range of its subnet. Additionally, instances in the public subnet should have a public IP address associated with their network interface.
To further verify DHCP functionality, we can check the DHCP lease information:
For Linux instances, we can examine the
/var/lib/dhclient/directory or
use command to view DHCP client logs.
journalctl -u systemd-networkd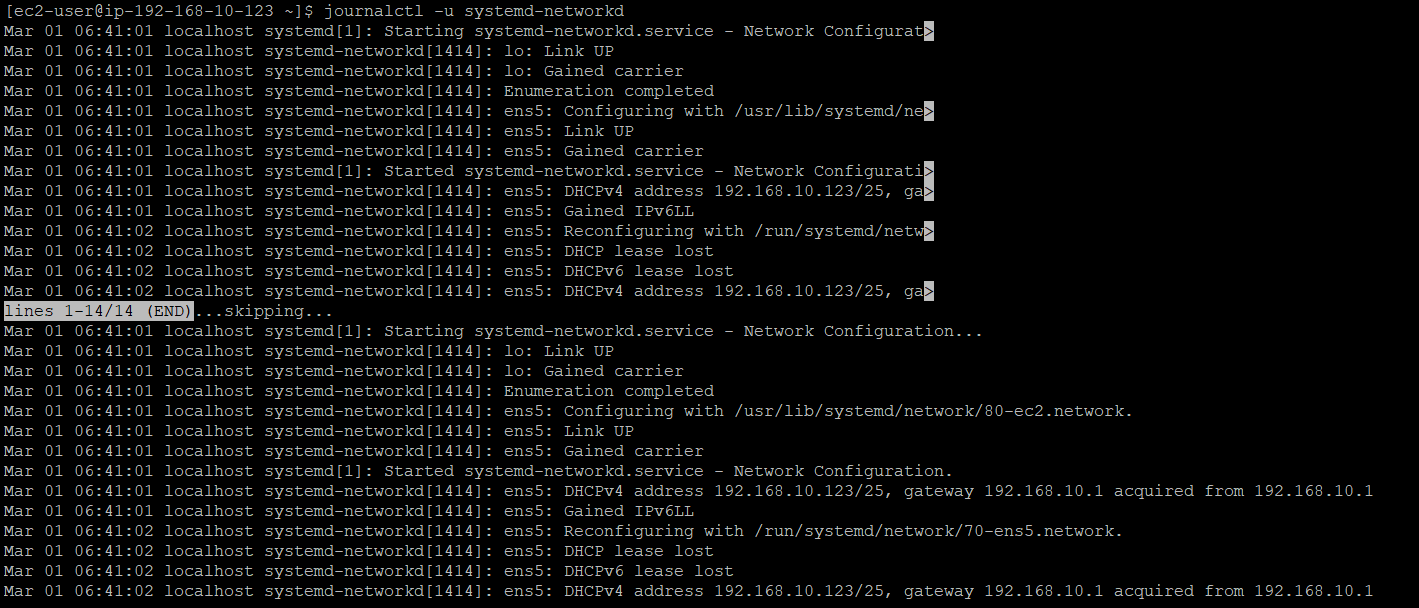
\For Windows instances, we can use the command
ipconfig /displaydnsto view DNS information obtained via DHCP.
We should also verify that DNS resolution is working correctly by attempting to resolve domain names:
For Linux instances, we can use the
nslookup or dig commands, such as
nslookup example.com or dig example.com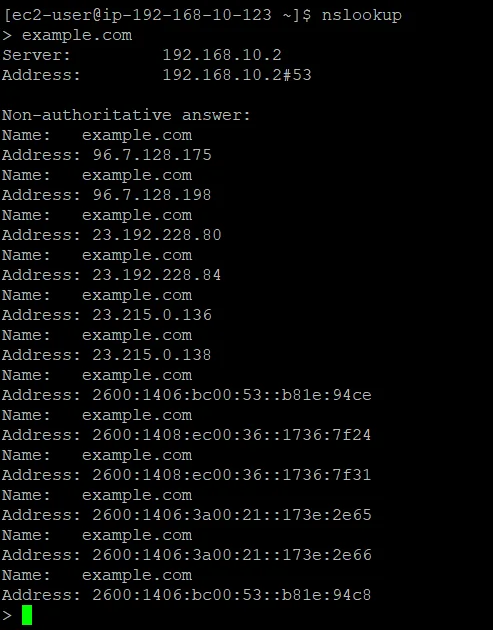
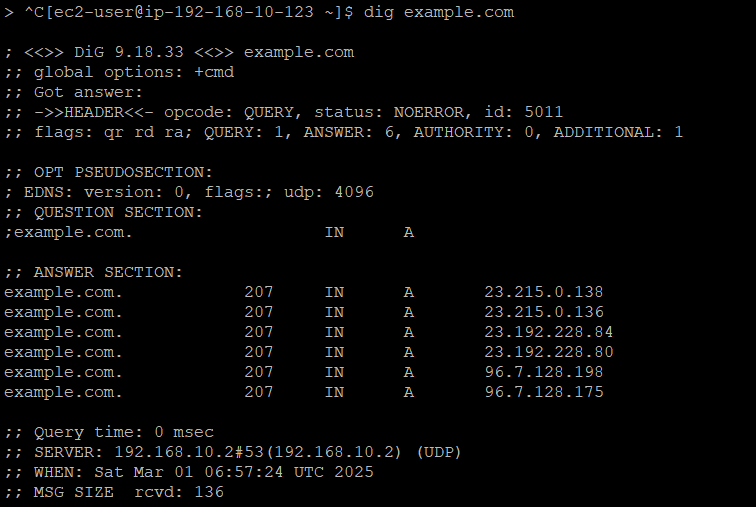
For Windows instances, we can use the nslookup command, such as
nslookup example.comThese commands should return the IP address associated with the domain name, confirming that the DNS servers specified in our DHCP Options Set are functioning correctly.
Testing Network Connectivity
The final phase of our project involves testing network connectivity to ensure that our network configuration is working as expected. This testing should verify that instances in the public subnet can access the internet, while instances in the private subnet cannot directly access the internet but can communicate with other instances within the VPC.
For instances in the public subnet, we can test internet connectivity using the ping command:
ping example.com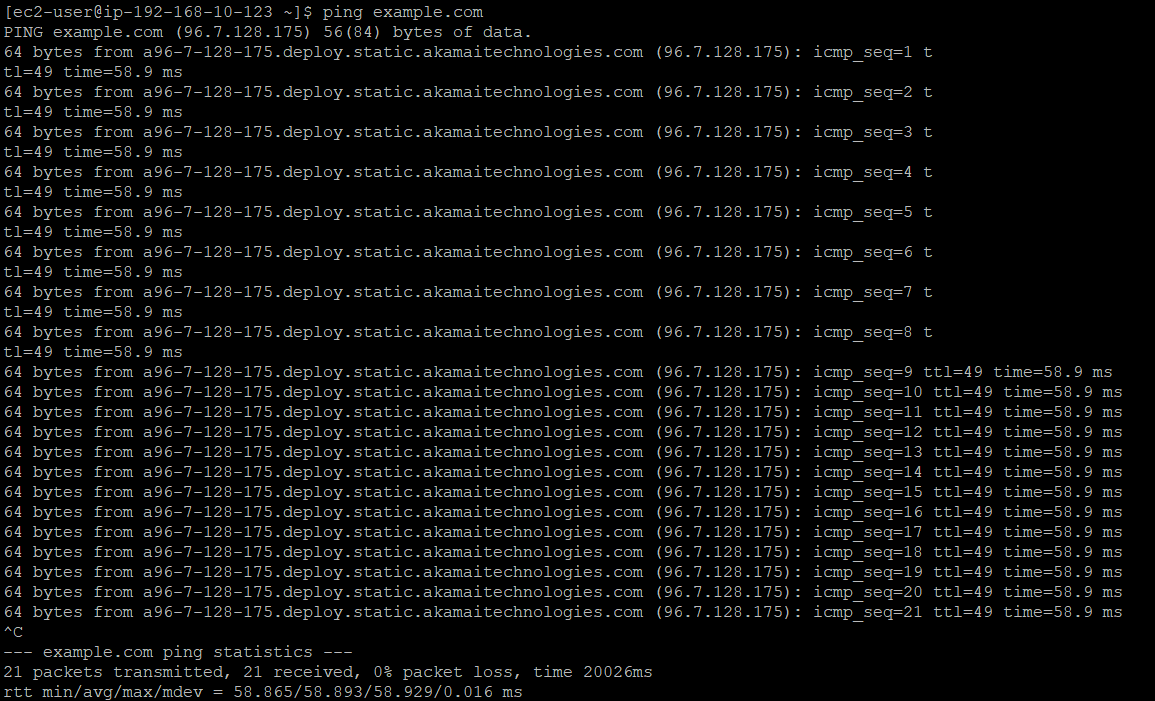
This command should show successful responses, indicating that the instance can reach external websites. We can also use the traceroute command (Linux) or tracert command (Windows) to visualize the network path:
traceroute example.com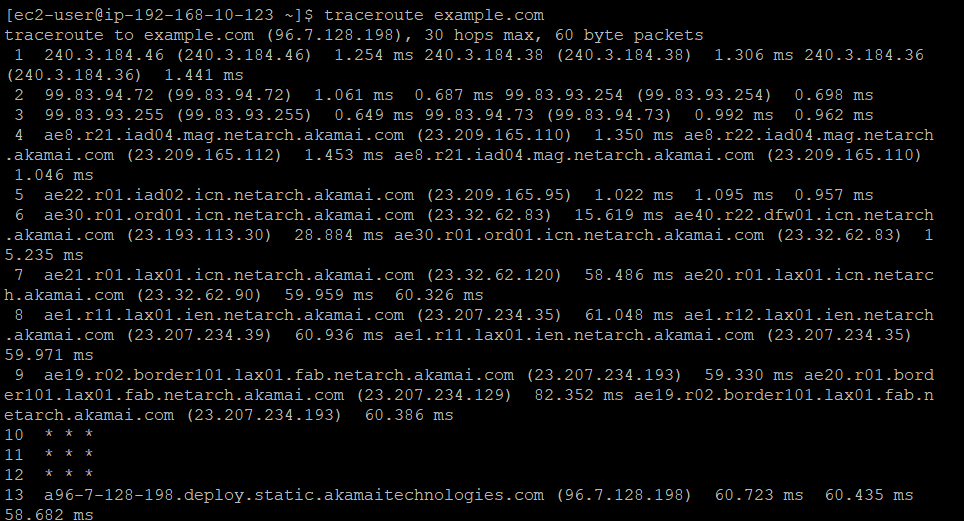
The output should show the packet traversing through the Internet Gateway to reach the external destination.
For instances in the private subnet, we should verify that they cannot directly access the internet:
ping example.comThis command should timeout or fail, indicating that the instance does not have a route to the internet. However, we should verify that instances in the private subnet can communicate with other instances within the VPC:
ping <private-ip-of-another-instance>This command should show successful responses, indicating that internal network communication is working correctly.
We should also test that instances in the private subnet can communicate with instances in the public subnet:
ping <private-ip-of-public-instance>Again, this command should show successful responses, confirming that the route table is correctly configured to allow communication between subnets.
Validating DHCP Lease Renewal
To thoroughly test our DHCPv4 configuration, we should validate the lease renewal process. DHCP leases are issued for a specific period, after which they need to be renewed. By default, AWS DHCP leases have a renewal time of approximately 24 hours, but for testing purposes, we can force a lease renewal by restarting the network service or rebooting the instance.
For Linux instances, we can restart the network service using:
sudo systemctl restart systemd-networkd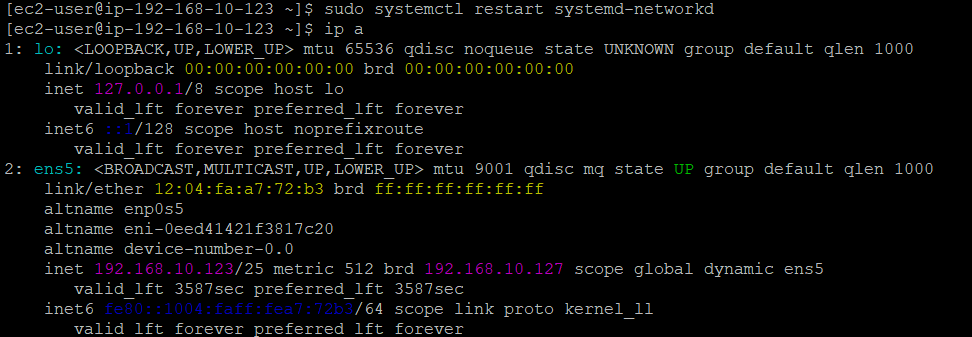
For Windows instances, we can restart the network adapter using:
ipconfig /release
ipconfig /renew
After forcing a lease renewal, we should check the IP configuration again to verify that the instance has received the same or a new IP address via DHCP. In a properly configured AWS VPC, instances typically receive the same private IP address upon lease renewal, ensuring network stability.
Advanced Configurations and Best Practices
Customizing DHCP Options
While our basic DHCP configuration serves well for testing purposes, production environments often require additional customization. AWS allows you to tailor DHCP Options Sets to meet specific organizational requirements:
Custom Domain Names: Instead of using the default AWS domain name, you can specify your organization’s domain name (e.g., example.com). This ensures that instances have fully qualified domain names that align with your naming conventions.
Custom DNS Servers: If your organization uses specific DNS servers for internal resource resolution, you can specify these in the DHCP Options Set. This allows instances to resolve both internal and external domain names correctly.
NTP Configuration: Time synchronization is critical for many applications, especially those that rely on distributed processing or cryptographic operations. By specifying your preferred NTP servers in the DHCP Options Set, you ensure that all instances maintain consistent time settings.
It’s worth noting that DHCP Options Sets are immutable in AWS. If you need to modify the options, you must create a new set and associate it with your VPC. This design encourages versioned configurations and reduces the risk of unintended changes affecting running instances.
Security Considerations
When implementing DHCPv4 in AWS, several security considerations should be taken into account:
DHCP Snooping: In traditional networks, DHCP snooping is a security feature that prevents rogue DHCP servers from distributing incorrect IP configurations. In AWS, DHCP service is provided by the platform itself, eliminating the risk of rogue servers. However, you should still be cautious about allowing arbitrary instances to run DHCP services, as this could interfere with AWS’s built-in DHCP functionality.
Network Segmentation: Our project demonstrates the importance of network segmentation through public and private subnets. This segmentation is a fundamental security principle, ensuring that sensitive resources are not directly exposed to the internet. You can further enhance this segmentation by implementing Network ACLs, which provide stateless filtering of traffic at the subnet level.
Security Groups: While not directly related to DHCP, security groups play a crucial role in controlling traffic to and from instances. Always follow the principle of least privilege when configuring security groups, allowing only necessary traffic and blocking everything else.
Monitoring and Troubleshooting
For production environments, monitoring and troubleshooting capabilities are essential to ensure the reliability of your network infrastructure:
VPC Flow Logs: Enable VPC Flow Logs to capture information about IP traffic going to and from network interfaces in your VPC. This data can be invaluable for troubleshooting connectivity issues or detecting suspicious network activity.
CloudWatch Metrics: Monitor the health of your VPC and its components using Amazon CloudWatch. Key metrics to monitor include VPC NAT gateway packet drops, VPC peering connection metrics, and Transit Gateway metrics.
DNS Query Logging: If your application relies heavily on DNS resolution, consider enabling Query Logging in Route 53 to track DNS queries made by instances in your VPC. This can help identify DNS-related issues that might impact application performance.
When troubleshooting DHCP issues in AWS, common problems include:
Incorrect DHCP Options Set Association: Verify that the correct DHCP Options Set is associated with your VPC by checking the VPC details in the AWS Management Console.
DNS Resolution Issues: If instances are unable to resolve domain names, check that the Domain Name Servers in your DHCP Options Set are correctly specified and reachable from your VPC.
IP Address Conflicts: While rare in AWS due to its managed nature, IP address conflicts can occur if you manually assign IP addresses that fall within the DHCP range. Always use separate ranges for static and dynamic allocations.
Conclusion
The configuration and testing of DHCPv4 in AWS represent a fundamental aspect of cloud networking. By establishing a properly configured DHCP environment, organizations can automate IP address management, ensuring consistent network settings across their cloud infrastructure while reducing administrative overhead.
Throughout this project, we’ve explored the key components of AWS networking, including VPCs, subnets, DHCP Options Sets, Internet Gateways, and route tables. We’ve walked through the step-by-step process of configuring these components to create a functional network environment with dynamic IP address assignment. By verifying DHCP functionality across multiple EC2 instances and testing network connectivity, we’ve confirmed the effectiveness of our configuration.
The knowledge and skills developed through this project are directly applicable to real-world cloud deployments. As organizations continue to migrate their infrastructure to the cloud, understanding how to configure and manage network services such as DHCPv4 becomes increasingly valuable. Whether you’re preparing for AWS certification or building production-ready cloud environments, the principles and practices covered in this article provide a solid foundation for success in cloud networking.
By mastering DHCPv4 configuration in AWS, you’re not just learning about a specific protocol; you’re gaining insight into the broader principles of cloud networking, automation, and infrastructure as code. These skills will serve you well as you navigate the ever-evolving landscape of cloud computing, enabling you to design, deploy, and manage scalable, reliable, and secure network infrastructures in AWS and beyond.
Why is DHCPv4 important in AWS environments?
DHCPv4 plays a critical role in AWS environments by automating IP address management and network configuration distribution. Without DHCPv4, network administrators would need to manually assign and track IP addresses for each EC2 instance, which becomes increasingly complex and error-prone as infrastructure scales. DHCPv4 eliminates this challenge by dynamically assigning IP addresses and providing consistent network configurations such as DNS servers and domain names to instances. This automation not only reduces administrative overhead but also minimizes the risk of IP address conflicts and network connectivity issues. In AWS specifically, DHCPv4 is implemented through DHCP Option Sets, which allow for standardized network configurations across all resources within a VPC, ensuring consistency and reliability in your cloud network architecture.
What’s the difference between public and private subnets in AWS, and how does this affect DHCPv4 configuration?
Public and private subnets in AWS represent different security domains within your Virtual Private Cloud. The primary difference lies in their internet accessibility: public subnets have a route to the internet via an Internet Gateway, while private subnets do not. This distinction doesn’t directly affect how DHCPv4 assigns IP addresses, as instances in both subnet types receive their IP configurations through the same DHCP Option Set associated with the VPC. However, the subnet type influences the overall network configuration that instances receive. Instances in public subnets typically get both a private IP address (via DHCPv4) and a public IP address (if auto-assign public IP is enabled), while instances in private subnets only receive private IP addresses. This segmentation is crucial for security, allowing you to place internet-facing resources in public subnets while keeping sensitive resources in private subnets, protected from direct internet access.
How can I customize the DHCP Options Set for my organization’s specific needs?
AWS provides several customization options for DHCP Option Sets to meet specific organizational requirements. You can specify custom Domain Name Servers instead of using Amazon’s provided DNS servers, which is particularly useful if you need to resolve internal domain names or integrate with on-premises DNS infrastructure. You can also set a custom Domain Name to ensure instances receive fully qualified domain names aligned with your organization’s naming conventions. For time synchronization, you can specify custom NTP servers to ensure consistent time settings across all instances, which is critical for applications that depend on accurate timing. If your environment includes Windows instances, you can configure NetBIOS name servers and node types to support legacy Windows networking protocols. Remember that DHCP Option Sets are immutable in AWS—to modify settings, you must create a new Option Set and associate it with your VPC. This approach encourages versioned configurations and provides a clear change history.
What troubleshooting steps should I take if instances are not receiving the correct IP configurations via DHCPv4?
When troubleshooting DHCPv4 issues in AWS, start by verifying that the correct DHCP Option Set is associated with your VPC. Check the VPC details in the AWS Management Console to confirm this association. Next, examine the network interface configuration of the affected instances using commands like ip a (Linux) or ipconfig /all (Windows) to see what network settings they’ve received. If instances can’t resolve domain names, verify that the Domain Name Servers specified in your DHCP Option Set are reachable from your VPC and correctly configured. For persistent issues, check VPC Flow Logs to identify any blocked traffic that might be interfering with DHCP operations. Restarting the network service on instances or forcing a DHCP lease renewal can also help resolve temporary issues. If problems persist, consider launching a new instance in the same subnet to determine if the issue is specific to certain instances or affects the entire subnet. Finally, review security groups and network ACLs to ensure they’re not blocking DHCP traffic, which typically uses UDP ports 67 and 68.
How does AWS’s implementation of DHCPv4 differ from traditional on-premises DHCP deployments?
AWS’s implementation of DHCPv4 differs significantly from traditional on-premises deployments in several ways. In AWS, DHCP functionality is built into the platform through DHCP Option Sets rather than requiring dedicated DHCP server instances. This integrated approach provides higher reliability and eliminates the need to manage and scale DHCP server infrastructure. AWS also handles IP address management differently—private IP addresses assigned to instances within a subnet typically remain consistent throughout the instance lifecycle, even after reboots, providing greater stability than traditional DHCP leases which might change upon renewal. Security is another differentiator: AWS’s DHCP service is protected by the platform itself, eliminating concerns about rogue DHCP servers that might exist in traditional networks. Additionally, AWS’s DHCP implementation seamlessly integrates with other AWS services, such as Route 53 for DNS resolution and VPC endpoints for private connectivity to AWS services. Finally, AWS DHCP Option Sets can be managed programmatically through AWS APIs, CLI, or infrastructure as code tools like CloudFormation or Terraform, enabling automated and consistent network configurations across multiple environments.
