Just as you need your friends’ telephone numbers to call or text them, devices on a network need IP addresses to communicate with each other. An IP address serves as a unique identifier that allows computers, smartphones, switches, and other network devices to find and talk to one another. In this article, we’ll explore how to implement basic connectivity by configuring IP addressing on various network devices.
IPv4 Address Configuration Methods
IP address information can be configured on devices in two primary ways:
- Manual configuration: Directly entering the IP information into the device
- Automatic configuration: Using Dynamic Host Configuration Protocol (DHCP)
Let’s examine both methods in detail.
Manual IP Address Configuration
Configuring IP Addresses on Windows Computers
To manually set up an IPv4 address on a Windows computer, follow these steps:
- Open the Control Panel
- Navigate to Network Sharing Center
- Select Change adapter settings
- Choose the appropriate network adapter
- Right-click on the adapter and select Properties
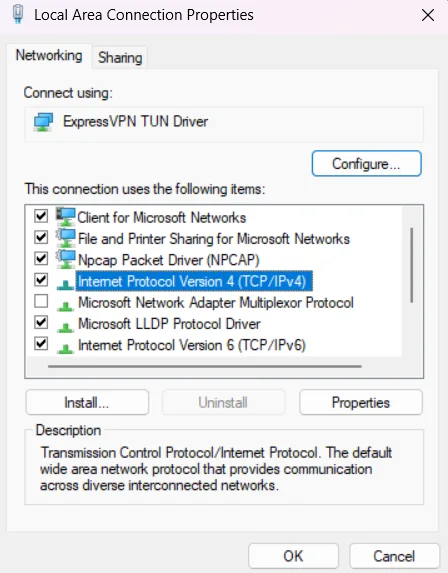
- In the connection properties window, find and highlight “Internet Protocol Version 4 (TCP/IPv4)”
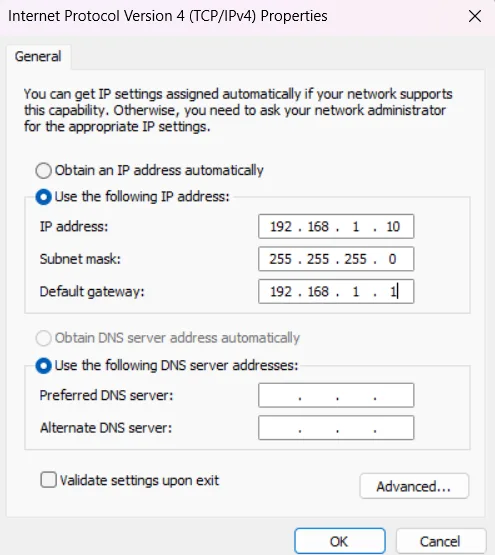
- Click Properties to open the configuration window
- Enter the required information:
- IP address
- Subnet mask
- Default gateway
- DNS server addresses (if needed)
This manual configuration process gives you complete control over your network settings, which is particularly important in environments where specific addressing schemes must be followed.
It’s worth noting that IPv6 addressing follows a similar configuration process, though the format of the addresses themselves differs significantly from IPv4.
Automatic IP Address Configuration
The Role of DHCP in Modern Networks
Dynamic Host Configuration Protocol (DHCP) has become an essential technology in virtually every network. To understand why DHCP is so widely used, consider the enormous administrative burden that would exist without it.
DHCP enables automatic IPv4 address configuration for any device that supports it (which is nearly all modern devices). Imagine the time required if every user had to manually enter their IP address, subnet mask, default gateway, and DNS server information each time they connected to a network. In an organization with hundreds or thousands of devices, this would create significant delays and productivity issues.
Beyond just saving time, automatic configuration through DHCP dramatically reduces the risk of address conflicts. When configured manually, it’s relatively easy to accidentally assign the same IP address to multiple devices, which can cause connectivity problems that are difficult to troubleshoot.
Configuring DHCP on Windows Computers
Setting up a Windows PC to use DHCP is straightforward:
- Access the same IPv4 Properties window described in the manual configuration section
- Select “Obtain an IP address automatically”
- Select “Obtain DNS server address automatically”
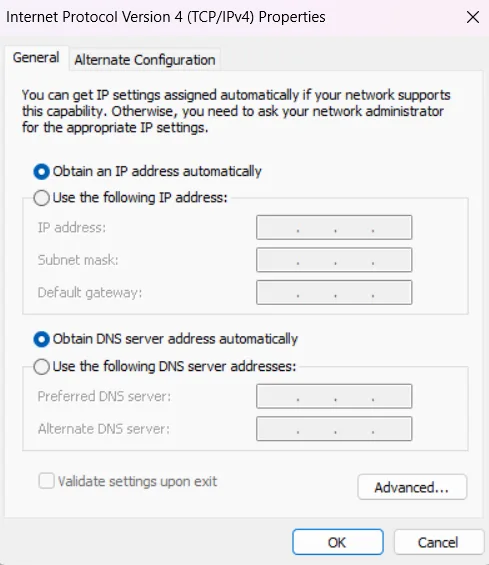
Once these options are enabled, your computer will search for a DHCP server on the network. When found, the DHCP server will assign all the necessary address settings required for network communication.
For IPv6, similar automatic configuration options exist through DHCPv6 and SLAAC (Stateless Address Autoconfiguration), which provide dynamic address allocation that accommodates the much larger IPv6 address space.
Verifying IP Configuration on Windows
After configuring IP settings, it’s important to verify that the settings were applied correctly. On Windows systems, you can check your current IP configuration using the Command Prompt and the ipconfig command:
- Open Command Prompt
- Type
ipconfigand press Enter
The output will display detailed information about all network interfaces, including:
- IPv4 address
- Subnet mask
- Default gateway
- DHCP status
- DNS server information
This command is invaluable for troubleshooting network connectivity issues or simply confirming your current network configuration.
Switch Virtual Interface Configuration
Configuring IP Addresses on Network Switches
Unlike computers, network switches typically don’t need IP addresses to perform their basic function of forwarding frames between devices. However, to manage a switch remotely, you’ll need to configure an IP address on its Switch Virtual Interface (SVI).
To configure an SVI on a switch, you’ll use the following steps:
- Enter global configuration mode with the
configure terminalcommand - Access the virtual interface with
interface vlan 1 - Assign an IP address using
ip address ip-address subnet-mask - Enable the interface with
no shutdown

After completing these steps, the switch will have all the IP configuration needed for remote management and network communication.
Similar to Windows computers, switches with IP addresses typically also need a default gateway configured. This is done using the ip default-gateway ip-address global configuration command, where the ip-address parameter is the IP address of the local router on the network.
Practical Implementation: Basic Network Configuration
Let’s walk through a practical example of configuring IP addresses on a small network consisting of two switches (S1 and S2) and two computers (PC1 and PC2).
Addressing Table:
- S1: IP 192.168.1.253, Subnet Mask 255.255.255.0, Interface VLAN 1
- S2: IP 192.168.1.254, Subnet Mask 255.255.255.0, Interface VLAN 1
- PC1: IP 192.168.1.1, Subnet Mask 255.255.255.0
- PC2: IP 192.168.1.2, Subnet Mask 255.255.255.0
Configuring the PCs
First, let’s configure IP addresses on both computers:
- On PC1:
- Access the IP Configuration settings
- Enter the IP address (192.168.1.1) and subnet mask (255.255.255.0)
- On PC2:
- Follow the same process to configure its IP address (192.168.1.2) and subnet mask (255.255.255.0)
At this point, if we try to test connectivity to the switches by using the ping command from PC1:
PC> ping 192.168.1.253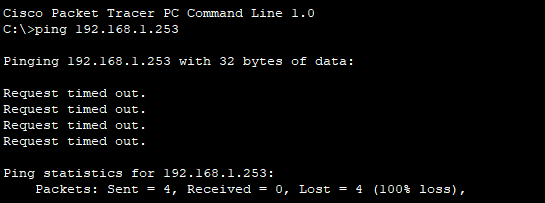
This would be unsuccessful because we haven’t yet configured IP addresses on the switches. The ping would fail because S1 doesn’t have an IP address to respond from.
Configuring the Switch Management Interfaces
Switches work as plug-and-play devices for basic frame forwarding, meaning they don’t require configuration to perform their primary function of moving data between connected devices based on MAC addresses.
However, we configure switches with IP addresses for management purposes. Adding an IP address allows network administrators to:
- Connect to the switch remotely via SSH or web interface
- Monitor the switch using network management protocols
- Update switch firmware remotely
- Back up or restore switch configurations
- Troubleshoot the switch without requiring physical access
Let’s configure S1 with an IP address:
S1# configure terminal
Enter configuration commands, one per line. End with CNTL/Z.
S1(config)# interface vlan 1
S1(config-if)# ip address 192.168.1.253 255.255.255.0
S1(config-if)# no shutdown
%LINEPROTO-5-UPDOWN: Line protocol on Interface Vlan1, changed state to up
S1(config-if)# exit
S1(config)# exit
S1#
The no shutdown command is essential because it activates the interface. By default, most interfaces on network devices are in a shutdown state (disabled) until explicitly enabled. Without this command, the interface would remain disabled, and the switch wouldn’t use the IP address we configured.
Next, we’ll configure S2 with its IP address using the same process:
S2# configure terminal
S2(config)# interface vlan 1
S2(config-if)# ip address 192.168.1.254 255.255.255.0
S2(config-if)# no shutdown
S2(config-if)# exit
S2(config)# exit
S2#

Verifying the Configuration
After configuring the switches, we should verify that the settings were applied correctly using the show ip interface brief command. This command displays a summary of all interfaces, including their IP addresses and operational status.
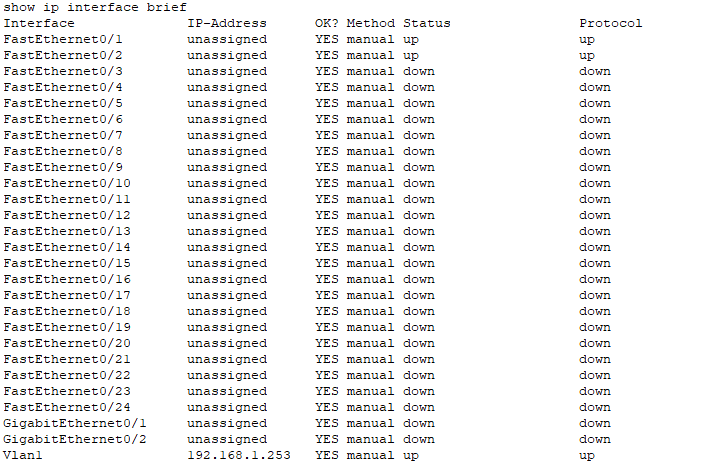
We should also save the configurations to ensure they persist after a reboot:
S1# copy running-config startup-config
Destination filename [startup-config]?
Building configuration...
[OK]
The same command should be executed on S2.
Testing Network Connectivity
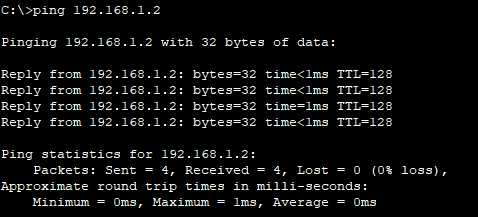
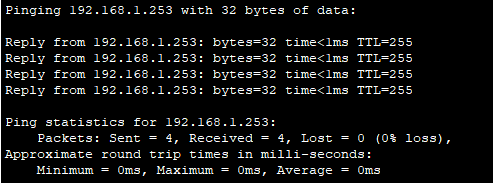
The final step is to verify that all devices can communicate with each other. We’ll use the ping command from various points in the network to confirm connectivity:
From PC1, we should try to ping:
- PC2 (192.168.1.2)
- S1 (192.168.1.253)
- S2 (192.168.1.254)
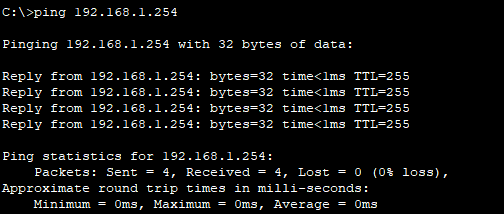
If all the pings succeed, we have confirmed that basic IP connectivity exists throughout the network. If any ping fails, we would need to troubleshoot the issue by checking:
- IP configurations on all devices
- Physical connections and link status
- Switch interface statuses
- Any security features that might be blocking communication
Conclusion
IP address configuration is a fundamental skill for network implementation and troubleshooting. Whether you’re setting up a small home network or configuring enterprise equipment, understanding both manual and automatic IP configuration methods is essential.
By properly configuring IP addresses on end devices and network equipment, you create the foundation for all network communication. Remember that while switches can forward frames based on MAC addresses without having an IP address themselves, configuring management IP addresses on switches enables remote administration and troubleshooting.
For most end-user devices, DHCP provides the simplest and most error-free method of IP configuration. For network infrastructure and servers that require stable addressing, manual configuration remains the preferred approach.
As networks continue to evolve and IPv6 adoption increases, these same principles will apply, though with different address formats and additional automatic configuration options through mechanisms like SLAAC.
What is the difference between a static and dynamic IP address?
A static IP address is manually configured and remains constant until explicitly changed by an administrator. It’s ideal for servers, printers, and network devices that need consistent addressing. In contrast, a dynamic IP address is temporarily assigned by a DHCP server and may change when the device reconnects to the network or when the lease expires. Dynamic addressing reduces administrative overhead and prevents address conflicts in large networks. Most home devices use dynamic addressing, while infrastructure devices typically use static addresses.
What should I do if I encounter an “IP address conflict” error?
An IP address conflict occurs when two devices on the same network are assigned identical IP addresses. To resolve this:
First, identify which devices have the conflict by checking network status messages or using the “ipconfig /all” command on Windows to see which device reports the conflict.
For immediate resolution, disconnect one of the conflicting devices from the network. Then reconfigure one device with a different IP address if using static addressing, or release and renew the DHCP lease if using dynamic addressing (using “ipconfig /release” followed by “ipconfig /renew” on Windows).
To prevent future conflicts, implement DHCP reservation for devices needing consistent addresses, or maintain a documented addressing scheme if using static IPs.
How do I know which subnet mask to use for my network?
The subnet mask determines which portion of an IP address identifies the network and which portion identifies the host. The most common subnet mask for small networks is 255.255.255.0 (or /24 in CIDR notation), which allows for up to 254 devices. Choose your subnet mask based on:
Network size: Larger networks need more host bits (smaller subnet mask values). Network segmentation needs: More subnets require more network bits (larger subnet mask values). For a typical home or small office, 255.255.255.0 is appropriate. Medium-sized networks might use 255.255.0.0 (/16), while enterprise networks often implement variable-length subnet masks based on specific requirements for different network segments.
Why can’t devices on my network communicate even though they have IP addresses in the same range?
If devices have IP addresses in the same range but cannot communicate, check these common issues:
Different subnet masks: Ensure all devices use the same subnet mask. Mismatched subnet masks can cause devices to incorrectly determine whether other devices are on the local network.
Firewall settings: Check if firewalls on the devices or network are blocking communication. Temporarily disable firewalls to test connectivity.
Physical connectivity: Verify that all devices are properly connected to the network and that switches or routers between them are functioning correctly.
Default gateway configuration: If communicating through a router, ensure the default gateway is correctly configured on all devices.
VLANs or network segmentation: Check if devices are placed in different VLANs or network segments that restrict communication.
When should I use IPv6 instead of IPv4 addressing?
Consider implementing IPv6 in these scenarios:
Address depletion: If you’re in a region where IPv4 addresses are scarce or expensive to acquire.
Future-proofing: For new network deployments that you want to remain viable without major reconfiguration as IPv6 adoption increases.
Specific application requirements: Some newer applications and services perform better with or require IPv6.
Mobile and IoT networks: IPv6’s larger address space better accommodates the massive number of connected devices in these scenarios.
ISP requirements: If your Internet Service Provider offers IPv6-only services or provides better performance over IPv6.
Most modern networks implement dual-stack configurations where both IPv4 and IPv6 operate simultaneously during the transition period. This provides the greatest compatibility while preparing for the eventual complete shift to IPv6.
